> ## Documentation Index
> Fetch the complete documentation index at: https://brightdata-ipv6-release.mintlify.site/llms.txt
> Use this file to discover all available pages before exploring further.
# Send Your First Request with Bright Data's Web Unlocker API
> A step-by-step guide to sending your first Web Unlocker API request with easy-to-follow code examples
Bright Data offers two methods for accessing Web Unlocker API, both delivering **identical** results while catering to different customer workflows:
A pure REST API method for easy access and straightforward integration.
For workflows that rely on proxy-based routing.
## Direct API access (recommended)
A simple and RESTful way to interact with Bright Data’s Web Unlocker API. Direct API access abstracts proxy management and allows you to send requests via a central endpoint, ensuring ease of use and straightforward REST API integration.
### Best for:
* Centralized endpoint: Access Web Unlocker API via a single, RESTful endpoint.
* Streamlined direct integration: Eliminating the complexity of managing proxies or routing.
* Single API key authentication: Secure and easy to use, replacing the need for username-password management.
### Sending your first request
After [setting up](https://docs.brightdata.com/scraping-automation/web-unlocker/quickstart) your Web Unlocker API zone, you'll find a working Web Unlocker API request example and your API token within your zone's **Overview** tab:
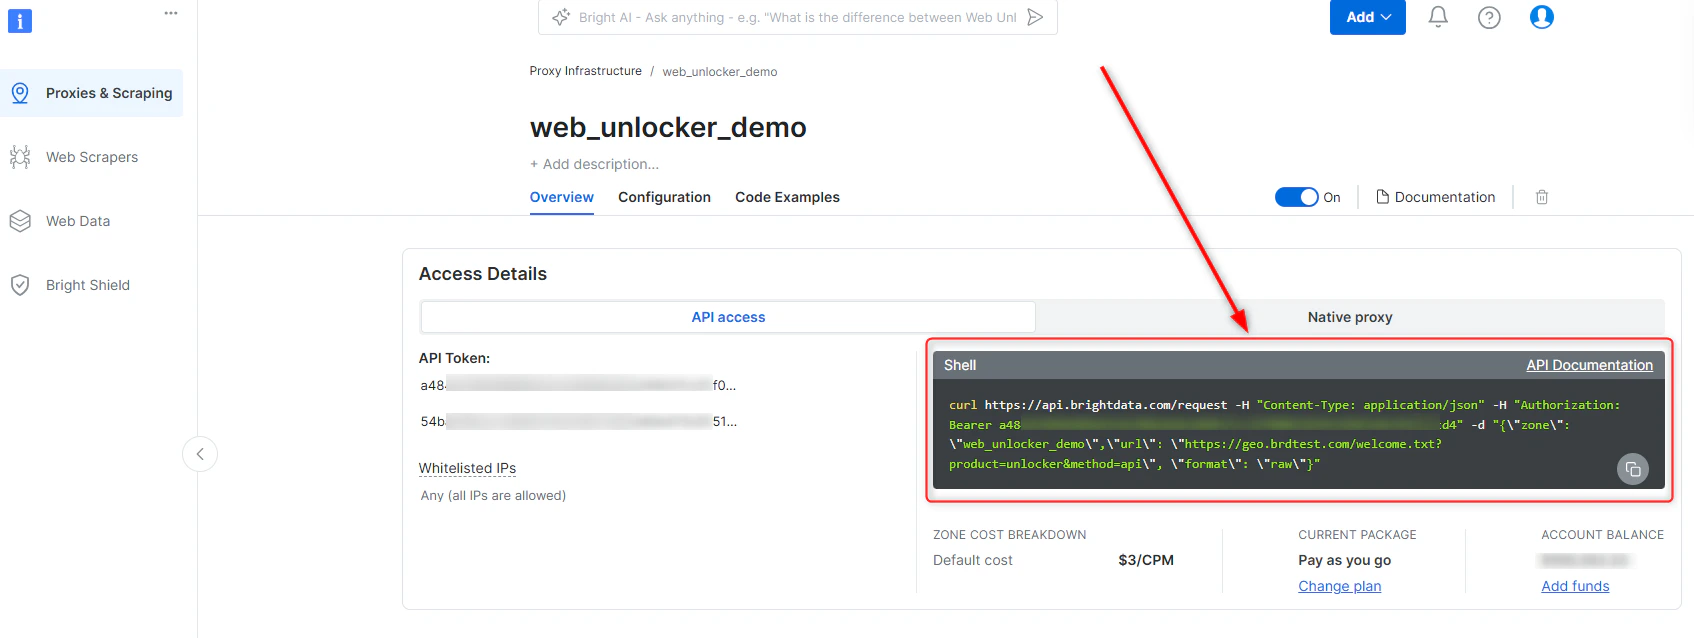 The following is an example of a simple Web Unlocker API cURL request:
```sh Direct API access - cURL theme={null}
curl -H "Content-Type: application/json" -H "Authorization: Bearer [INSERT_YOUR_API_TOKEN]" -d '{"zone": "[INSERT_YOUR_WEB_UNLOCKER_ZONE_NAME]","url": "[INSERT_YOUR_TARGET_URL]", "format": "raw"}' https://api.brightdata.com/request
```
### Request breakdown
1. API Endpoint: [`https://api.brightdata.com/request`](https://api.brightdata.com/request)
2. Authorization Header: `Authorization: Bearer [INSERT YOUR API TOKEN]`
\- Your API token is found within your Web Unlocker API zone.
3. Payload:
* `zone`: Your specific Web Unlocker API **zone name**.
* `url`: The target URL you wish to access via Web Unlocker API.
* `format`: Defines the response format. Use `raw` to receive the raw response from the target site.
### Generating your Bright Data API token
A Bright Data API token is your secure authentication token for accessing Web Unlocker API via Direct API access. When adding a new Web Unlocker API zone in the [control panel](https://brightdata.com/cp/zones), an API token will be generated automatically and can be found within the **Overview** tab of your zone.
The following is an example of a simple Web Unlocker API cURL request:
```sh Direct API access - cURL theme={null}
curl -H "Content-Type: application/json" -H "Authorization: Bearer [INSERT_YOUR_API_TOKEN]" -d '{"zone": "[INSERT_YOUR_WEB_UNLOCKER_ZONE_NAME]","url": "[INSERT_YOUR_TARGET_URL]", "format": "raw"}' https://api.brightdata.com/request
```
### Request breakdown
1. API Endpoint: [`https://api.brightdata.com/request`](https://api.brightdata.com/request)
2. Authorization Header: `Authorization: Bearer [INSERT YOUR API TOKEN]`
\- Your API token is found within your Web Unlocker API zone.
3. Payload:
* `zone`: Your specific Web Unlocker API **zone name**.
* `url`: The target URL you wish to access via Web Unlocker API.
* `format`: Defines the response format. Use `raw` to receive the raw response from the target site.
### Generating your Bright Data API token
A Bright Data API token is your secure authentication token for accessing Web Unlocker API via Direct API access. When adding a new Web Unlocker API zone in the [control panel](https://brightdata.com/cp/zones), an API token will be generated automatically and can be found within the **Overview** tab of your zone.
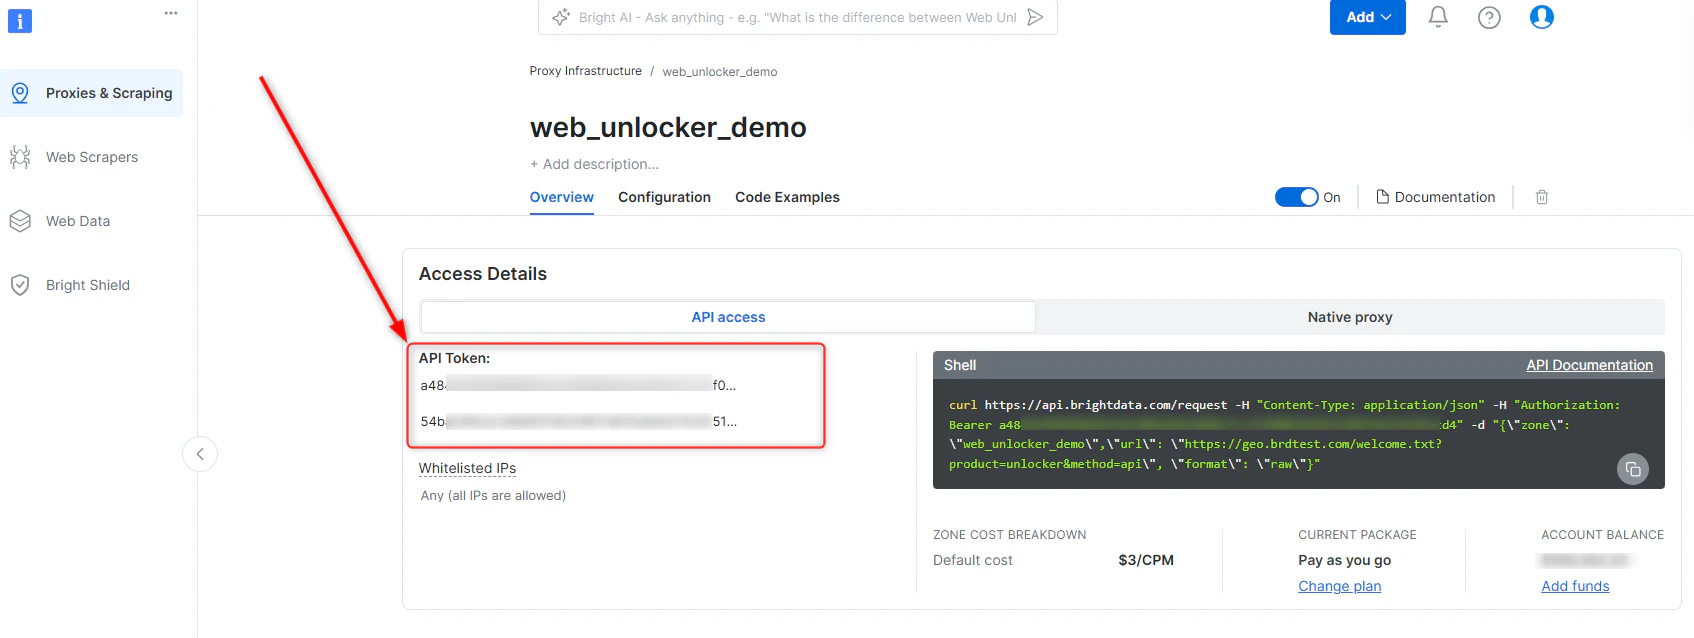 **To generate a new API key:**
* Navigate to [Account settings](https://brightdata.com/cp/setting/users).
* Scroll down and click the Add Token button.
* Follow the on-screen instructions to complete the process.
We strongly recommend having an expiration date set on your token for increased security.
The token will be shown to you on the screen **only** so make sure you copy and store it in a safe location per your organization's policies
## Native proxy-based access
In order to access Web Unlocker, you will need to provide credentials which are comprised of:
1. Your customer ID
2. Your Web Unlocker API zone name
3. Your Web Unlocker API password
4. Bright Data SSL certificate
#### Customer ID
Customer ID can be found in the welcome email you received, or by clicking your account initial letter on the top right screen of your control panel, or by clicking here: [Account settings](https://brightdata.com/cp/setting/customer_details) .
#### Zone name and password
Your zone name and password can be found in the overview tab of your unlocker zone in the control panel.
#### Bright Data SSL Certificate
Prevent SSL errors by setting up Bright Data SSL certificate
SSL Certificate can be found by clicking "SSL certificate" wizard on your zone's overview top menu. See further instructions here: [SSL certificate](/general/account/ssl-certificate#how-to-download-the-ssl-certificate).
Alternatively, you can [ignore SSL errors](/general/account/ssl-certificate#how-to-ignore-ssl-errors).
#### Web Unlocker API: HTTPS Proxy code examples
Once you have your credentials, use the following code to send your first request:
```sh cURL theme={null}
curl "http://lumtest.com/myip.json" --proxy brd.superproxy.io:33335 --proxy-user brd-customer--zone-:
```
```javascript Node.js theme={null}
#!/usr/bin/env node
require('request-promise')({
url: 'http://lumtest.com/myip.json',
proxy: 'http://brd-customer--zone-:@brd.superproxy.io:33335',
})
.then(function (data) {
console.log(data);
},
function (err) {
console.error(err);
});
```
```python Python theme={null}
import pprint
import requests
host = 'brd.superproxy.io'
port = 33335
username = 'brd-customer--zone-'
password = ''
proxy_url = f'http://{username}:{password}@{host}:{port}'
proxies = {
'http': proxy_url,
'https': proxy_url
}
url = "http://lumtest.com/myip.json"
response = requests.get(url, proxies=proxies)
pprint.pprint(response.json())
```
```php PHP theme={null}
-zone-:');
curl_exec($curl);
?>
```
```ruby Ruby theme={null}
#!/usr/bin/ruby
require 'uri'
require 'net/http'
require 'net/https'
puts 'To enable your free eval account and get CUSTOMER, YOURZONE and YOURPASS, please contact sales@brightdata.com'
uri = URI.parse('http://lumtest.com/myip.json')
proxy = Net::HTTP::Proxy('brd.superproxy.io', 33335, 'brd-customer--zone-', '')
req = Net::HTTP::Get.new(uri)
result = proxy.start(uri.host,uri.port, :use_ssl => uri.scheme == 'https') do |http|
http.request(req)
end
puts result.body
```
```cs C# theme={null}
using System;
using System.Net;
class Example {
static void Main() {
var client = new WebClient();
client.Proxy = new WebProxy("brd.superproxy.io:33335");
client.Proxy.Credentials = new NetworkCredential(
"brd-customer--zone-",
""
);
Console.WriteLine(client.DownloadString("http://lumtest.com/myip.json"));
}
```
```java Java theme={null}
package example;
import org.apache.http.HttpHost;
import org.apache.http.client.fluent.*;
public class Example {
public static void main(String[] args) throws Exception {
System.out.println("To enable your free eval account and get "
+"CUSTOMER, YOURZONE and YOURPASS, please contact "
+"sales@brightdata.com");
HttpHost proxy = new HttpHost("brd.superproxy.io", 33335);
String res = Executor.newInstance()
.auth(proxy, "brd-customer--zone-", "")
.execute(Request.Get("http://lumtest.com/myip.json").viaProxy(proxy))
.returnContent().asString();
System.out.println(res);
}
}
```
```perl Perl theme={null}
#!/usr/bin/perl
print 'To enable your free eval account and get CUSTOMER, YOURZONE and '
.'YOURPASS, please contact sales@brightdata.com';
use LWP::UserAgent;
my $agent = LWP::UserAgent->new();
$agent->proxy(['http', 'https'], "http://brd-customer--zone-:\@brd.superproxy.io:33335");
print $agent->get('http://lumtest.com/myip.json')->content();
```
```vb VBA theme={null}
Imports System.Net
Module Module1
Sub Main()
Console.WriteLine("To enable your free eval account and get " &
"CUSTOMER, YOURZONE and YOURPASS, please contact " &
"sales@brightdata.com")
Dim Client As New WebClient
Client.Proxy = New WebProxy("http://brd.superproxy.io:33335")
Client.Proxy.Credentials = New NetworkCredential("brd-customer--zone-", "")
Console.WriteLine(Client.DownloadString("http://lumtest.com/myip.json"))
End Sub
End Module
```
The code above uses the residential proxy to send a request to [http://lumtest.com/myip.json](http://lumtest.com/myip.json). It returns your IP information in a JSON format:
```json Output theme={null}
{
"ip": "ALLOCATED_IP",
"country": "PK",
"asn": {
"asnum": 203020,
"org_name": "HostRoyale Technologies Pvt Ltd"
},
"geo": {
"city": "Islamabad",
"region": "IS",
"region_name": "Islamabad",
"postal_code": "44040",
"latitude": 33.7233,
"longitude": 73.0435,
"tz": "Asia/Karachi",
"lum_city": "islamabad",
"lum_region": "is"
}
}
```
Now, replace “[https://lumtest.com/myip.json”](https://lumtest.com/myip.json”) with the website of your choice.
**To generate a new API key:**
* Navigate to [Account settings](https://brightdata.com/cp/setting/users).
* Scroll down and click the Add Token button.
* Follow the on-screen instructions to complete the process.
We strongly recommend having an expiration date set on your token for increased security.
The token will be shown to you on the screen **only** so make sure you copy and store it in a safe location per your organization's policies
## Native proxy-based access
In order to access Web Unlocker, you will need to provide credentials which are comprised of:
1. Your customer ID
2. Your Web Unlocker API zone name
3. Your Web Unlocker API password
4. Bright Data SSL certificate
#### Customer ID
Customer ID can be found in the welcome email you received, or by clicking your account initial letter on the top right screen of your control panel, or by clicking here: [Account settings](https://brightdata.com/cp/setting/customer_details) .
#### Zone name and password
Your zone name and password can be found in the overview tab of your unlocker zone in the control panel.
#### Bright Data SSL Certificate
Prevent SSL errors by setting up Bright Data SSL certificate
SSL Certificate can be found by clicking "SSL certificate" wizard on your zone's overview top menu. See further instructions here: [SSL certificate](/general/account/ssl-certificate#how-to-download-the-ssl-certificate).
Alternatively, you can [ignore SSL errors](/general/account/ssl-certificate#how-to-ignore-ssl-errors).
#### Web Unlocker API: HTTPS Proxy code examples
Once you have your credentials, use the following code to send your first request:
```sh cURL theme={null}
curl "http://lumtest.com/myip.json" --proxy brd.superproxy.io:33335 --proxy-user brd-customer--zone-:
```
```javascript Node.js theme={null}
#!/usr/bin/env node
require('request-promise')({
url: 'http://lumtest.com/myip.json',
proxy: 'http://brd-customer--zone-:@brd.superproxy.io:33335',
})
.then(function (data) {
console.log(data);
},
function (err) {
console.error(err);
});
```
```python Python theme={null}
import pprint
import requests
host = 'brd.superproxy.io'
port = 33335
username = 'brd-customer--zone-'
password = ''
proxy_url = f'http://{username}:{password}@{host}:{port}'
proxies = {
'http': proxy_url,
'https': proxy_url
}
url = "http://lumtest.com/myip.json"
response = requests.get(url, proxies=proxies)
pprint.pprint(response.json())
```
```php PHP theme={null}
-zone-:');
curl_exec($curl);
?>
```
```ruby Ruby theme={null}
#!/usr/bin/ruby
require 'uri'
require 'net/http'
require 'net/https'
puts 'To enable your free eval account and get CUSTOMER, YOURZONE and YOURPASS, please contact sales@brightdata.com'
uri = URI.parse('http://lumtest.com/myip.json')
proxy = Net::HTTP::Proxy('brd.superproxy.io', 33335, 'brd-customer--zone-', '')
req = Net::HTTP::Get.new(uri)
result = proxy.start(uri.host,uri.port, :use_ssl => uri.scheme == 'https') do |http|
http.request(req)
end
puts result.body
```
```cs C# theme={null}
using System;
using System.Net;
class Example {
static void Main() {
var client = new WebClient();
client.Proxy = new WebProxy("brd.superproxy.io:33335");
client.Proxy.Credentials = new NetworkCredential(
"brd-customer--zone-",
""
);
Console.WriteLine(client.DownloadString("http://lumtest.com/myip.json"));
}
```
```java Java theme={null}
package example;
import org.apache.http.HttpHost;
import org.apache.http.client.fluent.*;
public class Example {
public static void main(String[] args) throws Exception {
System.out.println("To enable your free eval account and get "
+"CUSTOMER, YOURZONE and YOURPASS, please contact "
+"sales@brightdata.com");
HttpHost proxy = new HttpHost("brd.superproxy.io", 33335);
String res = Executor.newInstance()
.auth(proxy, "brd-customer--zone-", "")
.execute(Request.Get("http://lumtest.com/myip.json").viaProxy(proxy))
.returnContent().asString();
System.out.println(res);
}
}
```
```perl Perl theme={null}
#!/usr/bin/perl
print 'To enable your free eval account and get CUSTOMER, YOURZONE and '
.'YOURPASS, please contact sales@brightdata.com';
use LWP::UserAgent;
my $agent = LWP::UserAgent->new();
$agent->proxy(['http', 'https'], "http://brd-customer--zone-:\@brd.superproxy.io:33335");
print $agent->get('http://lumtest.com/myip.json')->content();
```
```vb VBA theme={null}
Imports System.Net
Module Module1
Sub Main()
Console.WriteLine("To enable your free eval account and get " &
"CUSTOMER, YOURZONE and YOURPASS, please contact " &
"sales@brightdata.com")
Dim Client As New WebClient
Client.Proxy = New WebProxy("http://brd.superproxy.io:33335")
Client.Proxy.Credentials = New NetworkCredential("brd-customer--zone-", "")
Console.WriteLine(Client.DownloadString("http://lumtest.com/myip.json"))
End Sub
End Module
```
The code above uses the residential proxy to send a request to [http://lumtest.com/myip.json](http://lumtest.com/myip.json). It returns your IP information in a JSON format:
```json Output theme={null}
{
"ip": "ALLOCATED_IP",
"country": "PK",
"asn": {
"asnum": 203020,
"org_name": "HostRoyale Technologies Pvt Ltd"
},
"geo": {
"city": "Islamabad",
"region": "IS",
"region_name": "Islamabad",
"postal_code": "44040",
"latitude": 33.7233,
"longitude": 73.0435,
"tz": "Asia/Karachi",
"lum_city": "islamabad",
"lum_region": "is"
}
}
```
Now, replace “[https://lumtest.com/myip.json”](https://lumtest.com/myip.json”) with the website of your choice.