> ## Documentation Index
> Fetch the complete documentation index at: https://brightdata-ipv6-release.mintlify.site/llms.txt
> Use this file to discover all available pages before exploring further.
# How to Set Up Bright Data With Multilogin
> Integrating Bright Data with Multilogin enhances your multi-account management, offering secure, undetectable browsing with improved privacy and reduced risk of account bans.
### Your proxy access information
Bright Data proxies are grouped in "Proxy zones". Each zone holds the configuration for the proxies it holds.
To get access to the proxy zone:
1. Login to Bright Data control panel
2. Select the proxy zone or setup a new one
3. Click on the new zone name, and select the **Overview** tab.
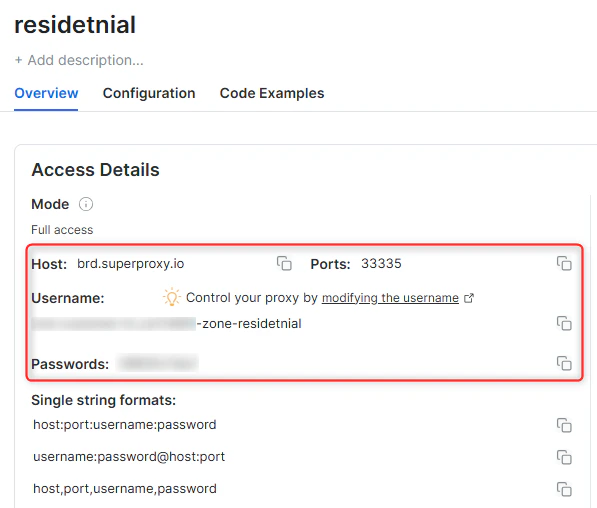
4. In the overview tab, under **Access details** you can find the proxy access details, and copy them to clipboard on click.
5. You will need: Proxy Host, Proxy Port, Proxy Zone username and Proxy Zone password.
6. Click on the copy icons to copy the text to your clipboard and paste in your tool's proxy configuration.
### Access Details Section Example
 ### Residential proxy access
To access Bright Data's **Residential Proxies** you will need to either get verified by our compliance team, or install a certificate. [Read more...](https://docs.brightdata.com/proxy-networks/residential/network-access)
### Targeting search engines?
If you target a search engine like google, bing or yandex, you need a special Search Engine Results Page (**SERP**) proxy API. Use Bright Data SERP API to target search engines.
[Click here to read more about Bright Data SERP proxy API.](https://docs.brightdata.com/scraping-automation/serp-api/introduction)
### Correct setup of proxy test to avoid "PROXY ERROR"
In many tools you will see a "test proxy" function, which performs a conncectivity test to your proxy, and some add a geolocation test as well, to identify the location of the proxy.
To correctly test your proxy you should target those search queries to:
`https://geo.brdtest.com/welcome.txt` .
Some tools use popular search engines (like google.com) as a default test target. Bright Data will block those requests and you tool will show **proxy error** although your proxy is perfectly fine.
If your proxy test fails, this is probably the reason. Make sure that your test domain is not a search engine (this is done in the tool configuration, and not controlled by Bright Data).
## What is Multilogin?
Multilogin is a powerful browser tool designed for managing multiple online accounts without the risk of detection or bans. It’s a popular choice for marketers, e-commerce professionals, affiliate marketers, and growth hackers who need to bypass platform restrictions that flag accounts linked to the same IP address or device.
Multilogin works by creating isolated, unique browsing profiles that simulate separate devices. Each profile appears as if it’s being accessed from a different location or device, making it impossible for platforms to link accounts. This ensures safer, undetected browsing, so you can manage multiple accounts with confidence.
Maintain a consistent IP throughout your browser session by using the `-session` parameter in your username. This is essential because BrightData proxies default to rotating IPs with each request. [Learn more](https://docs.brightdata.com/proxy-networks/faqs#how-to-use-the-same-ip-for-an-extended-period-of-time-and-how-long-can-i-keep-it-long-session)
### Residential proxy access
To access Bright Data's **Residential Proxies** you will need to either get verified by our compliance team, or install a certificate. [Read more...](https://docs.brightdata.com/proxy-networks/residential/network-access)
### Targeting search engines?
If you target a search engine like google, bing or yandex, you need a special Search Engine Results Page (**SERP**) proxy API. Use Bright Data SERP API to target search engines.
[Click here to read more about Bright Data SERP proxy API.](https://docs.brightdata.com/scraping-automation/serp-api/introduction)
### Correct setup of proxy test to avoid "PROXY ERROR"
In many tools you will see a "test proxy" function, which performs a conncectivity test to your proxy, and some add a geolocation test as well, to identify the location of the proxy.
To correctly test your proxy you should target those search queries to:
`https://geo.brdtest.com/welcome.txt` .
Some tools use popular search engines (like google.com) as a default test target. Bright Data will block those requests and you tool will show **proxy error** although your proxy is perfectly fine.
If your proxy test fails, this is probably the reason. Make sure that your test domain is not a search engine (this is done in the tool configuration, and not controlled by Bright Data).
## What is Multilogin?
Multilogin is a powerful browser tool designed for managing multiple online accounts without the risk of detection or bans. It’s a popular choice for marketers, e-commerce professionals, affiliate marketers, and growth hackers who need to bypass platform restrictions that flag accounts linked to the same IP address or device.
Multilogin works by creating isolated, unique browsing profiles that simulate separate devices. Each profile appears as if it’s being accessed from a different location or device, making it impossible for platforms to link accounts. This ensures safer, undetected browsing, so you can manage multiple accounts with confidence.
Maintain a consistent IP throughout your browser session by using the `-session` parameter in your username. This is essential because BrightData proxies default to rotating IPs with each request. [Learn more](https://docs.brightdata.com/proxy-networks/faqs#how-to-use-the-same-ip-for-an-extended-period-of-time-and-how-long-can-i-keep-it-long-session)
New users should begin with ISP or Data Center proxies, as residential proxies are incompatible with browser integration in [Immediate-Access mode](https://docs.brightdata.com/proxy-networks/residential/network-access#immediate-access) .
For use-cases related to **account management**, use a consistent static dedicated IP for each account you are managing. dedicated [ISP proxies](https://docs.brightdata.com/proxy-networks/isp/introduction) should be used for this.
## Multilogin Proxy Integration
Follow these simple steps to set up Bright Data proxies in Multilogin:
Launch the [**Multilogin app**](https://multilogin.com/) and log in to your account.
Click on **New Profile** and enter the following details:
* **Profile Name:** Choose a name for your profile (e.g., *Bright Data*).
* **Operating System:** Select the operating system that matches your original setup (macOS, Windows, or Linux) to avoid fingerprint discrepancies.
* **Storage Type:** Choose **Cloud Storage** if you plan to work in a team or use the profile on multiple devices.
* **Browser Type:** Select between **Mimic** (based on Chrome) or **Stealthfox** (based on Firefox). Both options offer excellent anti-detection features.
Within the profile settings, navigate to the **Proxy** section and choose **Custom**.
Follow these steps to enter your Bright Data proxy details:
* **Proxy**: Choose from `HTTP`, `HTTPS`, or `SOCKS5` (based on your proxy type).
* **New address:** Enter `http://brd.superproxy.io/`.
* **Port**: Use the port number provided in your [Bright Data dashboard](https://brightdata.com/cp/zones).
* **Login**: Enter your Bright Data proxy `username`.
* **Password**: Enter your Bright Data proxy `password`.
Click **Check Proxy** to verify the connection.
**For country-specific proxies, you can enter a format like `your-username-country-US` to receive a US exit node.**
Once you’ve entered all the proxy details, click **Create Profile** to save your settings.
And that's it! You’ve successfully integrated Bright Data proxies with Multilogin.