> ## Documentation Index
> Fetch the complete documentation index at: https://brightdata-ipv6-release.mintlify.site/llms.txt
> Use this file to discover all available pages before exploring further.
# 如何配置代理管理器
> 详细了解代理管理器的功能、如何根据您的需求定制它以及如何实现流行的最佳化工作流程。
## 安装
***
我们的代理管理器易于在您的本地机器或远程服务器上安装和维护,但建议使用我们的云服务器来完全访问代理管理器所提供的所有内容。
### Bright Data 云托管
在本地托管代理管理器需要负载平衡和维护解决方案——我们可以为您托管!
我们提供具有单一用户界面的多实例云来控制您的代理管理器的操作。
* 要启用此选项,请在您的账户的代理管理器页面上选择“激活”,系统将自动提供实例: [https://brightdata.com/cp/lpm](https://brightdata.com/cp/lpm)
### 本地/远程安装
要通过本地/远程方式将它安装在特定的操作系统上,最低要求是:
* 2GB 内存
* 1个 CPU
* 3GB 硬盘
相应操作系统的安装方法:
从我们的 GitHub 版本中下载安装程序文件: [https://github.com/luminati-io/luminati-proxy/tags](https://github.com/luminati-io/luminati-proxy/tags)
确保下载最新版本。
Linux CentOS 8.x is not supported (use CentOS 7.x instead!)
* Confirm the recommended hardware requirements:
1. 4GB RAM
2. 2 CPUs
3. 3GB SSD
* Confirm the recommended software requirements:
* [Node.js](https://nodejs.org/en/about/) supported versions: `12.18.3 - 14.18.1`
* [NPM](https://docs.npmjs.com/about-npm) supported versions: `6.14.6 - 8.1.3`
You can manually install NPM v6.14.6:
```sh theme={null}
sudo npm install -g npm@6.14.6
```
* Confirm that network traffic is not limited:
* The server/computer does not use any VPN or proxy IP!
* The OS firewall is turned off
* in and out traffic is permitted for TCP ports 20000-30000
* Install 代理管理器 by running from a terminal one of the following commands:
```sh theme={null}
curl -L https://brightdata.com/static/lpm/luminati-proxy-latest-setup.sh | bash
wget -qO- https://brightdata.com/static/lpm/luminati-proxy-latest-setup.sh | bash
sudo npm install -g @luminati-io/luminati-proxy
```
You can find more information on [Manual 安装 instructions](https://github.com/luminati-io/luminati-proxy#linuxmacos---manual-install).
A docker image can be found [here](https://hub.docker.com/r/luminati/luminati-proxy/)
```sh theme={null}
docker pull luminati/luminati-proxy
docker run luminati/luminati-proxy proxy-manager
docker run luminati/luminati-proxy proxy-manager --version
```
* Make sure to forward appropriate ports. Proxy manager uses by default 22999 for the web console and the API, [`33335`](https://docs.brightdata.com/cn/general/faqs#which-port-shall-i-use-22225-or-33335) for dropin and 24000-24... for all the ports that you'll create.
* To run docker with cli option see the below example:
```sh theme={null}
sudo docker run -v ~/proxy_manager:/lpm -p 127.0.0.1:22999:22999 -p 127.0.0.1:22998:22998 -p 127.0.0.1:24000:24000 luminati/luminati-proxy pmgr --www_whitelist_ips 172.17.0.1 --config /lpm/config.json
```
***
## 预设
***
如果您需要加载整页,请使用此预设。 手动从浏览器(例如 Chrome/Firefox)或以编程方式(例如 Puppeteer/Selenium)进行连接。 所有请求均共享相同的 IP。 您可以控制何时从用户界面或 API 刷新 IP。
Use this preset if you want to get a fresh new IP on each single request. This preset also rotates the User-Agent header automatically. It's the best for scraping API when you don't load the full pages.
Build your own preset fit your needs
Using a custom preset requires testing in the internal environment before going to production to verify the process is working as expected
## 规则和标头
***
导航到“规则”,并开始根基于以下触发器构建自己的规则,例如:
* URL 后缀
* 状态码
* 在响应主体中找到的字符串值
* 请求延迟
您可以分别选择对每个触发器采取的操作。
例如,通过使媒体 URL 的输出无效来实施节省带宽的规则。
此外,您可以在“规则”部分下提前实现所需的标头。
例如,在 i686 CPU 上添加 Linux 桌面的用户代理标头(有关用户代理的更多信息可在此处找到)
[https://developers.whatismybrowser.com/useragents/explore/](https://developers.whatismybrowser.com/useragents/explore/)
## 端口定位
***
Bright Data 代理管理器允许使用 IP:PORT 格式来定位代理。 例如,在本地安装代理管理器时,定位索引为24000的端口:
```sh theme={null}
curl --proxy 127.0.0.1:24000 "https://target.site"
```
如果是远程安装,只需将127.0.0.1与远程服务器 IP 地址切换。 (而不是 IP:PORT USERNAME:PASSWORD)
```sh theme={null}
curl --proxy brd.superproxy.io:33335 --proxy-user brd-customer--zone-: "https://target.site"
```
这可以实现:
* 从请求中移除 username:password 部分。
* 与仅接受 IP:Port 格式的第三方软件集成
* 整洁的代码。 可以预先为端口配置所有必要的标头和规则,而无需调整命令/请求本身。 More information is available [here](https://docs.brightdata.com/cn/api-reference/proxy-manager/update_a_proxy_port)
## 添加外部代理
***
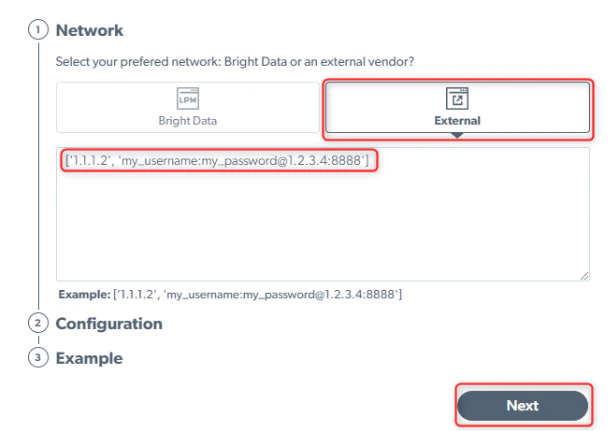
Bright Data 代理管理器支持来自其他供应商的外部代理。 连接外部代理将允许您在一处优化和管理所有代理。
* 登录您的代理管理器
* 设置新端口。
* Select 'External'
* 以下一种格式添加代理
```js theme={null}
[
'', ':@:'
]
```
* 点击“保存”,您将获得外部代理作为代理管理器的端口之一
 ## 流量计算差异
***
代理管理器是请求发起者和我们的超级代理服务器之间的中间人。 代理管理器统计信息可以在此处查看,超级代理统计信息可以在此处查看。因此,您发送到代理管理器的每个请求最终都会到达超级代理。但是流量计算可能会有所不同,原因如下:
* 代理管理器在发送请求时计算传入的请求,但是在请求到达代理管理器后,会附加额外的标头,以便请求的响应将包含有关请求流的更多信息(时间线、代理 IP 等)
* 从代理管理器到达超级代理服务器的请求会带有这些附加参数;这就是为什么超级代理计算的请求比最初到达代理管理器时略大的原因
* 代理管理器有时会添加标头以呈现更好的日志视图,但是账单中没有计算这些数据
综上所述,流量统计数据的主要来源应该是区域的页面,因为它代表超级代理编制的统计数据。
通常,Bright Data 使用区域的页面进行计算,并作为一个事实来源
发票和账单事件将根据区域计算触发
## 流量计算差异
***
代理管理器是请求发起者和我们的超级代理服务器之间的中间人。 代理管理器统计信息可以在此处查看,超级代理统计信息可以在此处查看。因此,您发送到代理管理器的每个请求最终都会到达超级代理。但是流量计算可能会有所不同,原因如下:
* 代理管理器在发送请求时计算传入的请求,但是在请求到达代理管理器后,会附加额外的标头,以便请求的响应将包含有关请求流的更多信息(时间线、代理 IP 等)
* 从代理管理器到达超级代理服务器的请求会带有这些附加参数;这就是为什么超级代理计算的请求比最初到达代理管理器时略大的原因
* 代理管理器有时会添加标头以呈现更好的日志视图,但是账单中没有计算这些数据
综上所述,流量统计数据的主要来源应该是区域的页面,因为它代表超级代理编制的统计数据。
通常,Bright Data 使用区域的页面进行计算,并作为一个事实来源
发票和账单事件将根据区域计算触发