> ## Documentation Index
> Fetch the complete documentation index at: https://brightdata-ipv6-release.mintlify.site/llms.txt
> Use this file to discover all available pages before exploring further.

# 如何设置 Bright Data 与 ParseHub

> 将 Bright Data 代理与 ParseHub 集成，可增强您的网页抓取能力，提供安全匿名访问，并降低被检测和 IP 封禁的风险。

<Accordion title="展开以获取您的 Bright Data 代理访问信息">
  ### 您的代理访问信息

  Bright Data 代理按“代理区域”（Proxy zones）进行分组。每个区域包含其对应的代理配置。&#x20;

  要获取代理区域的访问权限：&#x20;

  1. 登录 Bright Data 控制面板
  2. 选择现有代理区域或新建一个代理区域
  3. 点击新的区域名称，并选择 **概览（Overview）** 选项卡
  4. 在概览选项卡中，找到 **访问详情（Access details）**，并单击复制图标将代理访问信息复制到剪贴板&#x20;
  5. 您需要以下信息：代理主机（Proxy Host）、代理端口（Proxy Port）、代理区域用户名（Proxy Zone username）和代理区域密码（Proxy Zone password）
  6. 点击复制图标，将文本复制到剪贴板，并粘贴到您的工具的代理配置中&#x20;

  ### 访问详情示例

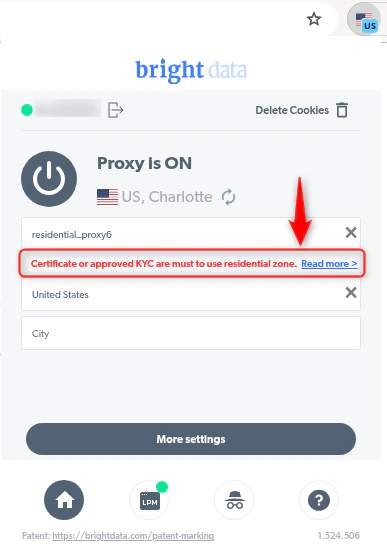
  <img src="https://mintcdn.com/brightdata-ipv6-release/I-B63f0As5k5UeY2/image.png?fit=max&auto=format&n=I-B63f0As5k5UeY2&q=85&s=10103802012b99bfb201e18a957518ba" alt="" width="387" height="558" data-path="image.png" />

  ### 住宅代理访问

  要使用 Bright Data 的 **住宅代理（Residential Proxies）**，您需要通过合规团队的验证或安装证书。[了解更多...](https://docs.brightdata.com/proxy-networks/residential/network-access)

  ### 目标是搜索引擎？

  如果您的目标是 Google、Bing 或 Yandex 等搜索引擎，则需要使用专门的搜索引擎结果页（**SERP**）代理 API。请使用 Bright Data SERP API 来访问搜索引擎。\
  [点击此处了解 Bright Data SERP 代理 API。](https://docs.brightdata.com/scraping-automation/serp-api/introduction)

  ### 避免工具中的 `PROXY ERROR`

  一些工具会使用搜索引擎作为代理测试目标：如果您的代理测试失败，这可能就是原因。请确保您的测试目标域名不是搜索引擎（此设置在工具配置中，而非 Bright Data 代理的控制范围内）。
</Accordion>

## 什么是 ParseHub？

ParseHub 是一款用户友好且功能强大的网页抓取工具，彻底改变了从网络中提取数据的方式。其直观的设计使用户能够轻松与复杂网站交互，处理 AJAX 和 JavaScript 元素，并浏览表单和无限滚动页面，而无需编写任何代码。\
通过将 Bright Data 代理与 ParseHub 集成，用户可获得无与伦比的优势，轻松应对最具挑战性的数据抓取任务。这一组合不仅能确保高效的数据抓取，还能提供高度的隐私和安全性，是专业人士寻求全面数据收集能力的理想解决方案。

## Bright Data 代理：助力您的 ParseHub 体验

将 Bright Data [代理](https://brightdata.com/proxy-types) 与 ParseHub 集成，可彻底改变您的网页抓取能力，为数据提取任务带来更高的效率和可靠性。以下是 Bright Data 代理解决方案为何是 ParseHub 强大抓取功能的理想搭配：

**广泛的代理网络**

* **全球覆盖**：访问 72,000,000+ IP 地址，遍布各个地区，确保您可以抓取任何地理位置的数据。
* **多样化的代理类型**：提供住宅代理、数据中心代理、静态住宅代理和移动代理，以满足不同抓取项目的需求。

**增强的匿名性与安全性**

* **强大隐私保护**：防止抓取活动被检测和拦截，确保操作匿名性。
* **安全数据收集**：借助 Bright Data 的高级安全措施，放心抓取敏感数据。

**高性能与高可靠性**

* **极速与高效**：即使面对复杂、依赖 JavaScript 的网站，也能实现快速高效的数据抓取。
* **稳定的连接性**：凭借 Bright Data 稳定的代理基础设施，减少中断，保持一致的抓取性能。

**多功能且可扩展的解决方案**

* **适用于多种使用场景**：无论是市场调研、网页抓取、SEO 分析，还是竞争情报收集，Bright Data 代理均能满足各种抓取需求。
* **可扩展性**：轻松扩展抓取操作，处理大规模数据，而不会影响速度或准确性。

**用户友好的集成方式**

* **简单的设置**：无论您的技术水平如何，都可轻松将 Bright Data 代理集成到 ParseHub。
* **全面的支持**：Bright Data 提供详尽的文档和客户支持，确保顺利完成集成过程。

## 如何集成 ParseHub 代理：

<Steps>
  <Step title="注册 Bright Data">
    1. 注册后，进入 Bright Data 仪表板
    2. 导航至“**代理和抓取基础设施**”部分
    3. **添加** 一个新的专用 **Zone** 以供代理使用。
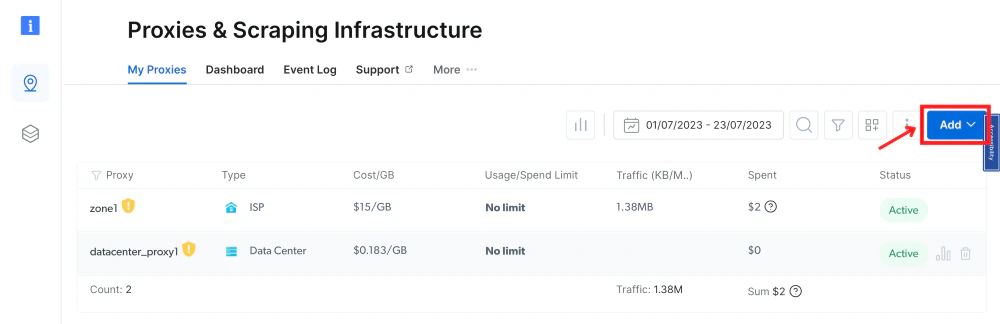
    <Frame caption="代理管理界面，显示活动代理和添加按钮">
      <img src="https://mintcdn.com/brightdata-ipv6-release/-FIhm7BYM4yhdqgc/images/integrations/ph-add-zone-2.png?fit=max&auto=format&n=-FIhm7BYM4yhdqgc&q=85&s=f667a2088b37687c45916e6a0d25e4a0" alt="ph-add-zone-2.png" width="1000" height="324" data-path="images/integrations/ph-add-zone-2.png" />
    </Frame>
  </Step>

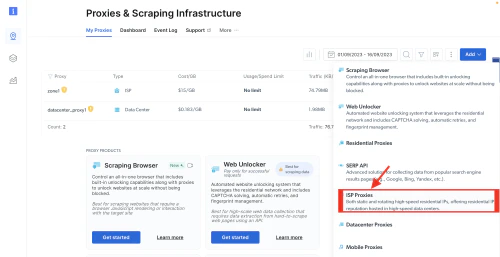
  <Step title="选择代理类型">
    在本示例中，我们将演示如何设置 ISP 代理。

    <Frame caption="代理和抓取基础设施仪表板，显示各种选项">
      <img src="https://mintcdn.com/brightdata-ipv6-release/-FIhm7BYM4yhdqgc/images/integrations/ph-proxy-types.png?fit=max&auto=format&n=-FIhm7BYM4yhdqgc&q=85&s=f1bc48fd0fc15c5f4bbd52fd4a8384a9" alt="ph-proxy-types.png" width="500" height="257" data-path="images/integrations/ph-proxy-types.png" />
    </Frame>
  </Step>

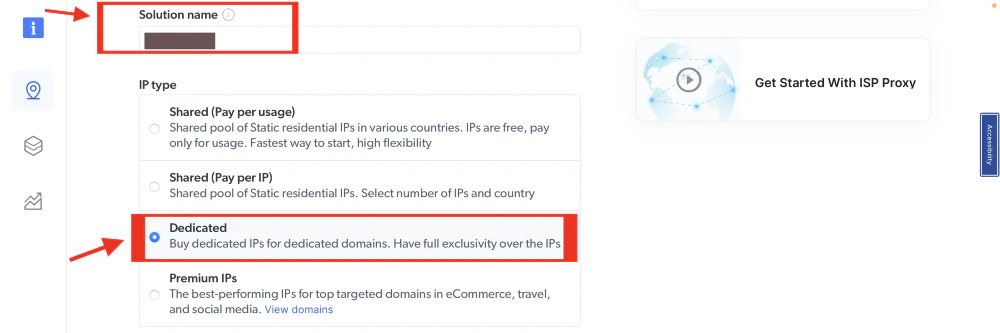
  <Step title="命名代理解决方案">
    <Frame caption="选择 IP 类型的表单，显示已选择专用选项">
      <img src="https://mintcdn.com/brightdata-ipv6-release/-FIhm7BYM4yhdqgc/images/integrations/ph-select-ip-type.png?fit=max&auto=format&n=-FIhm7BYM4yhdqgc&q=85&s=90ce208ec3477bfcb41d68a1abc7b3f8" alt="ph-select-ip-type.png" width="1000" height="333" data-path="images/integrations/ph-select-ip-type.png" />
    </Frame>
  </Step>

  <Step title="选择 IP 数量">
    填写所需的 IP 数量。

    <Frame>
      <img src="https://mintcdn.com/brightdata-ipv6-release/-FIhm7BYM4yhdqgc/images/integrations/ph-number-of-ips-1.png?fit=max&auto=format&n=-FIhm7BYM4yhdqgc&q=85&s=41c51af9e24d66a7eb0b1a82d2fed595" alt="ph-number-of-ips-1.png" width="1000" height="164" data-path="images/integrations/ph-number-of-ips-1.png" />
    </Frame>
  </Step>

  <Step title="国家和城市选择">
    选择所需的 IP 位置的国家和城市。

    <Frame caption="针对美国和纽约市的地理定位选项">
      <img src="https://mintcdn.com/brightdata-ipv6-release/-FIhm7BYM4yhdqgc/images/integrations/ph-city-ip.png?fit=max&auto=format&n=-FIhm7BYM4yhdqgc&q=85&s=63c4884725c5bed77646b9aefac038d1" alt="ph-city-ip.png" width="1000" height="197" data-path="images/integrations/ph-city-ip.png" />
    </Frame>
  </Step>

  <Step title="选择域名">
    使用特定域名，或选择“所有域名”以便一个 IP 可用于访问多个网站。

    <Frame>
      <img src="https://mintcdn.com/brightdata-ipv6-release/-FIhm7BYM4yhdqgc/images/integrations/ph-domains.png?fit=max&auto=format&n=-FIhm7BYM4yhdqgc&q=85&s=c4a0ebaf5aee858c7cf0825bd03add6e" alt="ph-domains.png" width="1000" height="178" data-path="images/integrations/ph-domains.png" />
    </Frame>
  </Step>

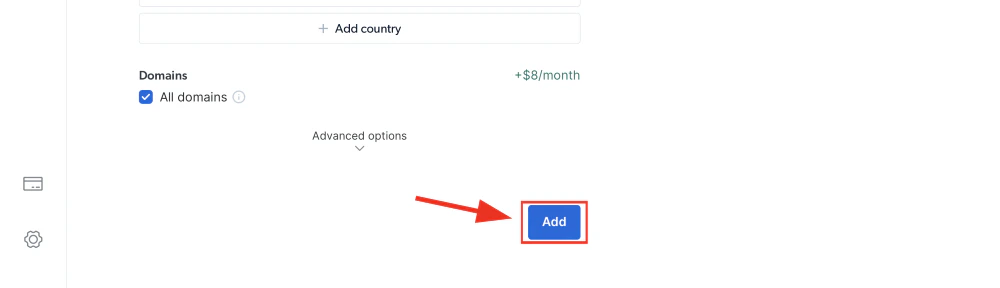
  <Step title="添加 Zone">
    点击“**添加**”按钮以创建 Zone。

    <Frame>
      <img src="https://mintcdn.com/brightdata-ipv6-release/-FIhm7BYM4yhdqgc/images/integrations/ph-click-add.png?fit=max&auto=format&n=-FIhm7BYM4yhdqgc&q=85&s=90ca6d6a311d7213e04678b966e78d96" alt="ph-click-add.png" width="1000" height="288" data-path="images/integrations/ph-click-add.png" />
    </Frame>
  </Step>

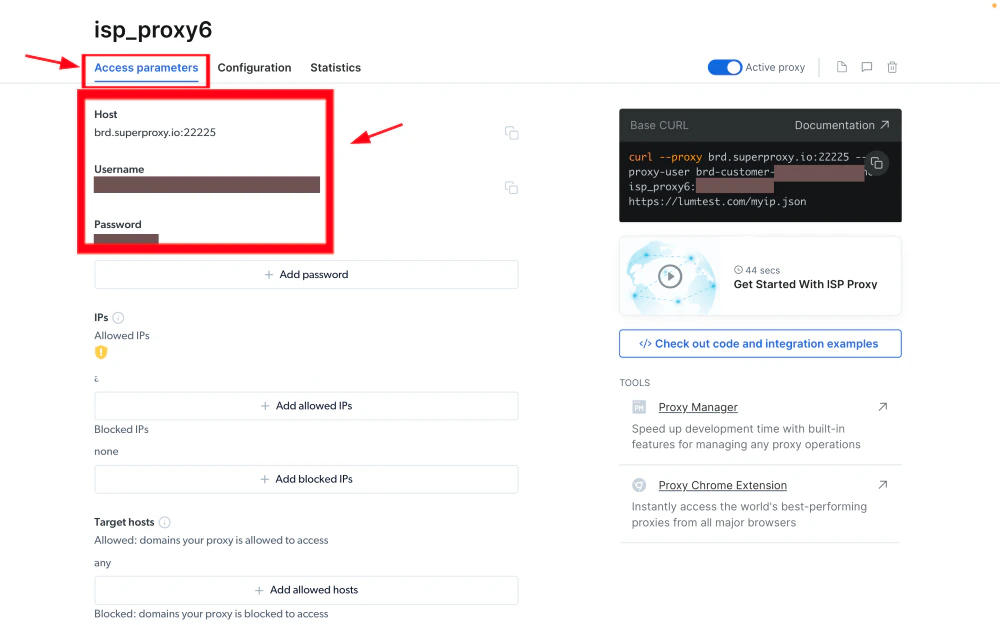
  <Step title="访问参数">
    点击您的 Zone 名称，导航到“访问参数”选项卡，并记录代理凭据：

    <Frame caption="代理服务访问参数界面，显示主机和用户名">
      <img src="https://mintcdn.com/brightdata-ipv6-release/-FIhm7BYM4yhdqgc/images/integrations/ph-access-parameters.png?fit=max&auto=format&n=-FIhm7BYM4yhdqgc&q=85&s=db75505433ccb4e24d14c10046e4a956" alt="ph-access-parameters.png" width="1000" height="625" data-path="images/integrations/ph-access-parameters.png" />
    </Frame>

    1. host: brd.superproxy.io
    2. port: 33335
    3. username: `your-zone-username`
    4. password: `your-zone-password`
  </Step>

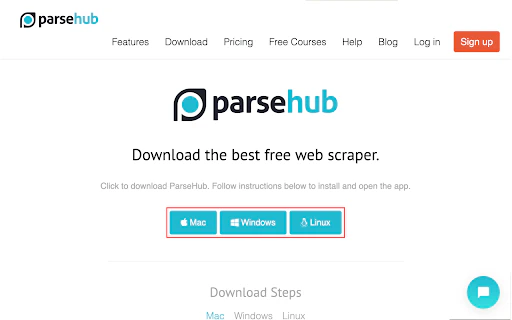
  <Step title="下载并安装 ParseHub">
    <Frame caption="ParseHub 下载选项：Mac、Windows、Linux">
      <img src="https://mintcdn.com/brightdata-ipv6-release/-FIhm7BYM4yhdqgc/images/integrations/ph-parsehub.png?fit=max&auto=format&n=-FIhm7BYM4yhdqgc&q=85&s=1c4cf8425634936694fb7c3eec50ab4d" alt="ph-parsehub.png" width="512" height="320" data-path="images/integrations/ph-parsehub.png" />
    </Frame>

    * 访问 ParseHub 官方网站，下载并安装适用于您的操作系统的 ParseHub 应用程序。
    * 启动 ParseHub，并创建新账户或登录现有账户。
  </Step>

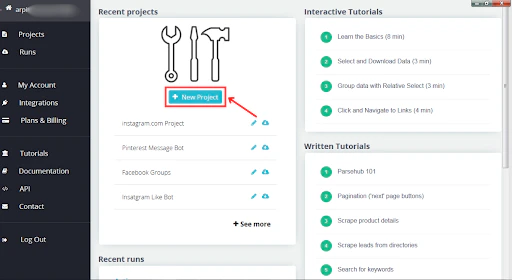
  <Step title="创建新项目">
    点击 ParseHub 主页上的“+ 新项目”按钮。

    <Frame caption="仪表板，显示项目创建和教程界面">
      <img src="https://mintcdn.com/brightdata-ipv6-release/-FIhm7BYM4yhdqgc/images/integrations/ph-create-a-new-project.png?fit=max&auto=format&n=-FIhm7BYM4yhdqgc&q=85&s=c589d0f945d88e8810fb5737b7ca1288" alt="ph-create-a-new-project.png" width="512" height="280" data-path="images/integrations/ph-create-a-new-project.png" />
    </Frame>
  </Step>

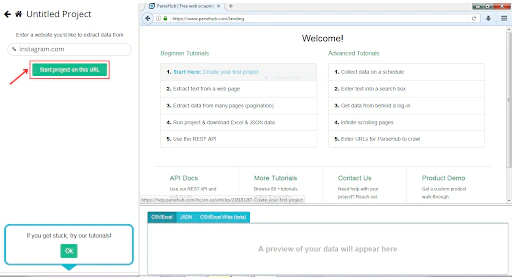
  <Step title="使用 URL 启动新项目">
    输入您想要抓取数据的网址（例如 instagram.com），然后点击“在此 URL 上启动项目”。

    <Frame caption="网页抓取工具界面，显示教程和说明">
      <img src="https://mintcdn.com/brightdata-ipv6-release/-FIhm7BYM4yhdqgc/images/integrations/ph-start-new-project.png?fit=max&auto=format&n=-FIhm7BYM4yhdqgc&q=85&s=15b9c178ab70d2612fc1d326b7aca89d" alt="ph-start-new-project.png" width="512" height="280" data-path="images/integrations/ph-start-new-project.png" />
    </Frame>
  </Step>

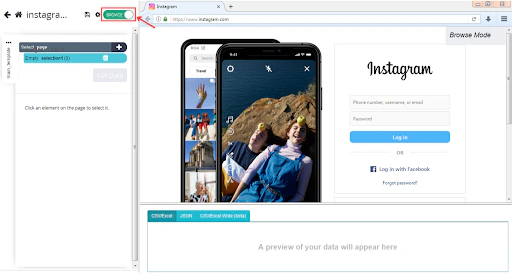
  <Step title="导航到 ParseHub 代理配置">
    切换到浏览器模式，滑块变绿表示已启用浏览模式。

    <Frame caption="Instagram 登录页面，显示图片预览">
      <img src="https://mintcdn.com/brightdata-ipv6-release/-FIhm7BYM4yhdqgc/images/integrations/ph-broswer-mode.png?fit=max&auto=format&n=-FIhm7BYM4yhdqgc&q=85&s=40fda172b5b07cd492a79750246de3fb" alt="ph-broswer-mode.png" width="512" height="280" data-path="images/integrations/ph-broswer-mode.png" />
    </Frame>
  </Step>

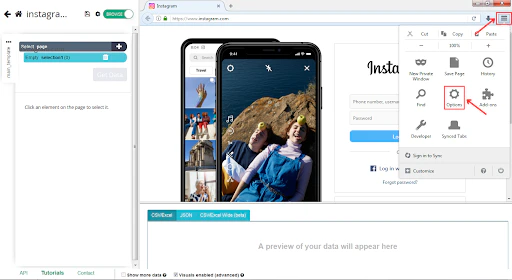
  <Step title="设置">
    打开浏览器界面右上角的设置，然后点击“选项”。

    <Frame caption="Instagram 网页，显示手机屏幕模拟工具">
      <img src="https://mintcdn.com/brightdata-ipv6-release/-FIhm7BYM4yhdqgc/images/integrations/ph-open-settings.png?fit=max&auto=format&n=-FIhm7BYM4yhdqgc&q=85&s=b67f66e267a807f79b4ce8f6d639275e" alt="ph-open-settings.png" width="512" height="280" data-path="images/integrations/ph-open-settings.png" />
    </Frame>
  </Step>

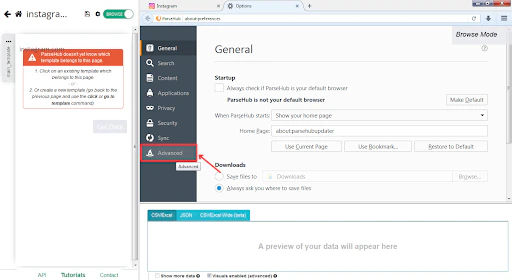
  <Step title="访问高级网络设置">
    选择“高级”选项卡。

    <Frame>
      <img src="https://mintcdn.com/brightdata-ipv6-release/-FIhm7BYM4yhdqgc/images/integrations/ph-advanced-network-settings.png?fit=max&auto=format&n=-FIhm7BYM4yhdqgc&q=85&s=623ce43b390d0e6833740d5e44256210" alt="ph-advanced-network-settings.png" width="512" height="280" data-path="images/integrations/ph-advanced-network-settings.png" />
    </Frame>
  </Step>

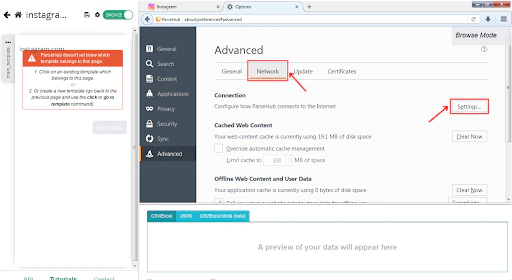
  <Step title="点击“网络”选项卡">
    在“连接”部分选择“设置”。

    <Frame caption="浏览器设置和错误消息界面">
      <img src="https://mintcdn.com/brightdata-ipv6-release/-FIhm7BYM4yhdqgc/images/integrations/ph-connection-settings.png?fit=max&auto=format&n=-FIhm7BYM4yhdqgc&q=85&s=1d7a7b22b14d92f68494034e42addbe4" alt="ph-connection-settings.png" width="512" height="280" data-path="images/integrations/ph-connection-settings.png" />
    </Frame>
  </Step>

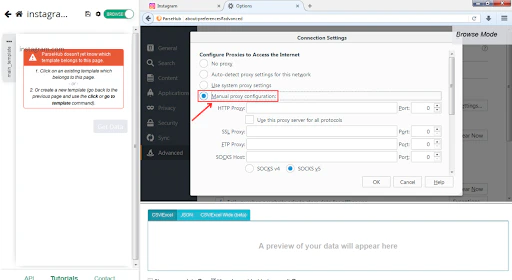
  <Step title="配置手动代理设置">
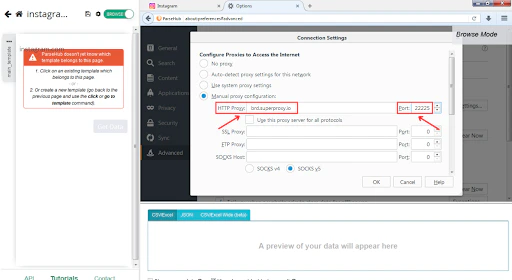
    在网络设置中，选择“手动代理配置”。

    <Frame caption="在浏览器选项中配置手动代理设置">
      <img src="https://mintcdn.com/brightdata-ipv6-release/-FIhm7BYM4yhdqgc/images/integrations/ph-configure-manual-settings.png?fit=max&auto=format&n=-FIhm7BYM4yhdqgc&q=85&s=724e8c8cb6beb899f95e376e641434a2" alt="ph-configure-manual-settings.png" width="512" height="280" data-path="images/integrations/ph-configure-manual-settings.png" />
    </Frame>
  </Step>

  <Step title="代理设置">
    在 HTTP 代理字段中输入 Bright Data 代理 URL **brd.superproxy.io**，端口设为 **33335**。

    <Frame caption="浏览器窗口中的代理配置设置截图">
      <img src="https://mintcdn.com/brightdata-ipv6-release/-FIhm7BYM4yhdqgc/images/integrations/ph-proxy-and-port.png?fit=max&auto=format&n=-FIhm7BYM4yhdqgc&q=85&s=7e4e9a3a035cb783d5ace92e075bec3e" alt="ph-proxy-and-port.png" width="512" height="280" data-path="images/integrations/ph-proxy-and-port.png" />
    </Frame>
  </Step>

  <Step title="切换到 SOCKS v4 并点击 OK">
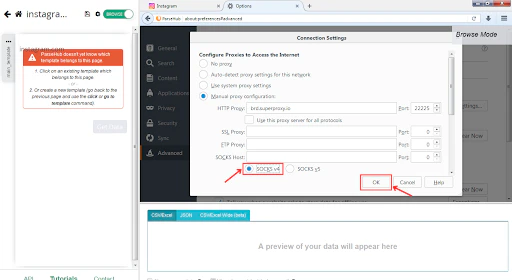
    切换到 SOCKS v4 后，点击“OK”按钮。

    <Frame caption="浏览器选项窗口中配置代理设置">
      <img src="https://mintcdn.com/brightdata-ipv6-release/-FIhm7BYM4yhdqgc/images/integrations/ph-switch-to-socks.png?fit=max&auto=format&n=-FIhm7BYM4yhdqgc&q=85&s=ec8033682c2a6ad256234e1627f4a6d5" alt="ph-switch-to-socks.png" width="512" height="280" data-path="images/integrations/ph-switch-to-socks.png" />
    </Frame>
  </Step>

  <Step title="代理 Zone 凭据">
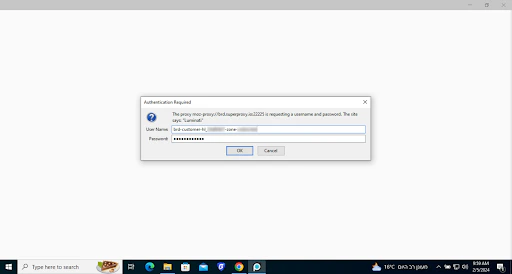
    输入您的代理 Zone 凭据，这些信息可以在您的代理 Zone 访问参数中找到。

    <Frame caption="计算机屏幕上的密码身份验证弹出窗口">
      <img src="https://mintcdn.com/brightdata-ipv6-release/h4pbzaN5I3wXYzPO/images/integrations/ph-access-param-parsehub.png?fit=max&auto=format&n=h4pbzaN5I3wXYzPO&q=85&s=ef2786a1bb2fe0b6a10cbb6731ca58fe" alt="ph-access-param-parsehub.png" width="512" height="274" data-path="images/integrations/ph-access-param-parsehub.png" />
    </Frame>
  </Step>

  <Step title="格式化代理配置">
    * 按以下格式填写您的代理信息：IPAddress:Port:Username:Password:Realm。
    * 对于 Bright Data 代理，格式如下：\
      `brd.superproxy.io:33335:brd-customer-hl_******-zone-isp_proxy6:b1s*****:Luminati`

    应用已配置的代理到 ParseHub 项目：

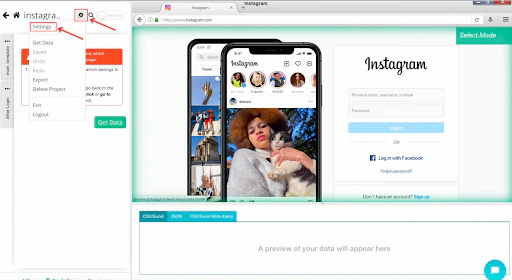
    * 导航至 ParseHub 项目设置。

    <Frame caption="Instagram 网页，显示设置菜单">
      <img src="https://mintcdn.com/brightdata-ipv6-release/-FIhm7BYM4yhdqgc/images/integrations/ph-project-settings.png?fit=max&auto=format&n=-FIhm7BYM4yhdqgc&q=85&s=2f9fad047c6b71f7b53c1a611fde5bc1" alt="ph-project-settings.png" width="512" height="280" data-path="images/integrations/ph-project-settings.png" />
    </Frame>
  </Step>

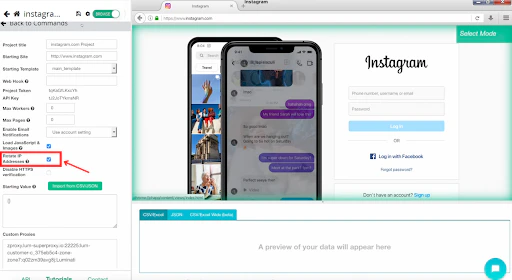
  <Step title="启用自定义代理">
    勾选“轮换 IP 地址”以启用“自定义代理”文本框。

    <Frame caption="Instagram 抓取工具界面，显示数据提取">
      <img src="https://mintcdn.com/brightdata-ipv6-release/-FIhm7BYM4yhdqgc/images/integrations/ph-custom-proxies.png?fit=max&auto=format&n=-FIhm7BYM4yhdqgc&q=85&s=5b667973464e1572db04c9a306d69e9c" alt="ph-custom-proxies.png" width="512" height="280" data-path="images/integrations/ph-custom-proxies.png" />
    </Frame>
  </Step>

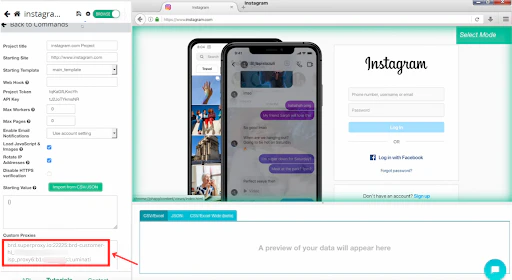
  <Step title="自定义代理字段">
    将格式化后的代理粘贴到“自定义代理”字段中。对于多个代理，每行输入一个。

    <Frame caption="Instagram 界面，显示用户对话和登录页面">
      <img src="https://mintcdn.com/brightdata-ipv6-release/-FIhm7BYM4yhdqgc/images/integrations/ph-custom-proxies-field.png?fit=max&auto=format&n=-FIhm7BYM4yhdqgc&q=85&s=e8019d86545f07adc0874578149bd92c" alt="ph-custom-proxies-field.png" width="512" height="280" data-path="images/integrations/ph-custom-proxies-field.png" />
    </Frame>
  </Step>

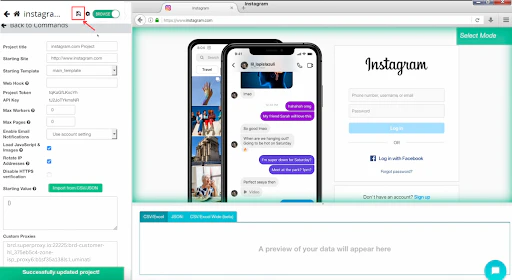
  <Step title="保存您的项目设置">
    保存后，使用 Bright Data 代理运行项目。

    <Frame caption="Instagram 登录页面，显示手机消息界面">
      <img src="https://mintcdn.com/brightdata-ipv6-release/-FIhm7BYM4yhdqgc/images/integrations/ph-save-project.png?fit=max&auto=format&n=-FIhm7BYM4yhdqgc&q=85&s=e3b43ab40bbb8602f702c19758b1cfea" alt="ph-save-project.png" width="512" height="280" data-path="images/integrations/ph-save-project.png" />
    </Frame>
  </Step>
</Steps>

<Warning>
  **重要提示**：

  如果您使用 Bright Data 的住宅代理、Web Unlocker 或 SERP API，则需要安装 SSL 证书，以启用与目标网站的端到端安全连接。

  这个过程很简单，请参阅[本指南](/cn/general/account/ssl-certificate#installation-of-the-ssl-certificate)了解安装说明。
</Warning>