> ## Documentation Index
> Fetch the complete documentation index at: https://brightdata-ipv6-release.mintlify.site/llms.txt
> Use this file to discover all available pages before exploring further.

# 如何通过 Bright Data 设置 Entra ID（原 Azure Active Directory）SSO 和配置

* 应用程序准备工作
* 设置 SSO
* 设置 SCIM 配置

## 应用程序准备工作

* 访问 [https://entra.microsoft.com/](https://entra.microsoft.com/) 并登录账户。
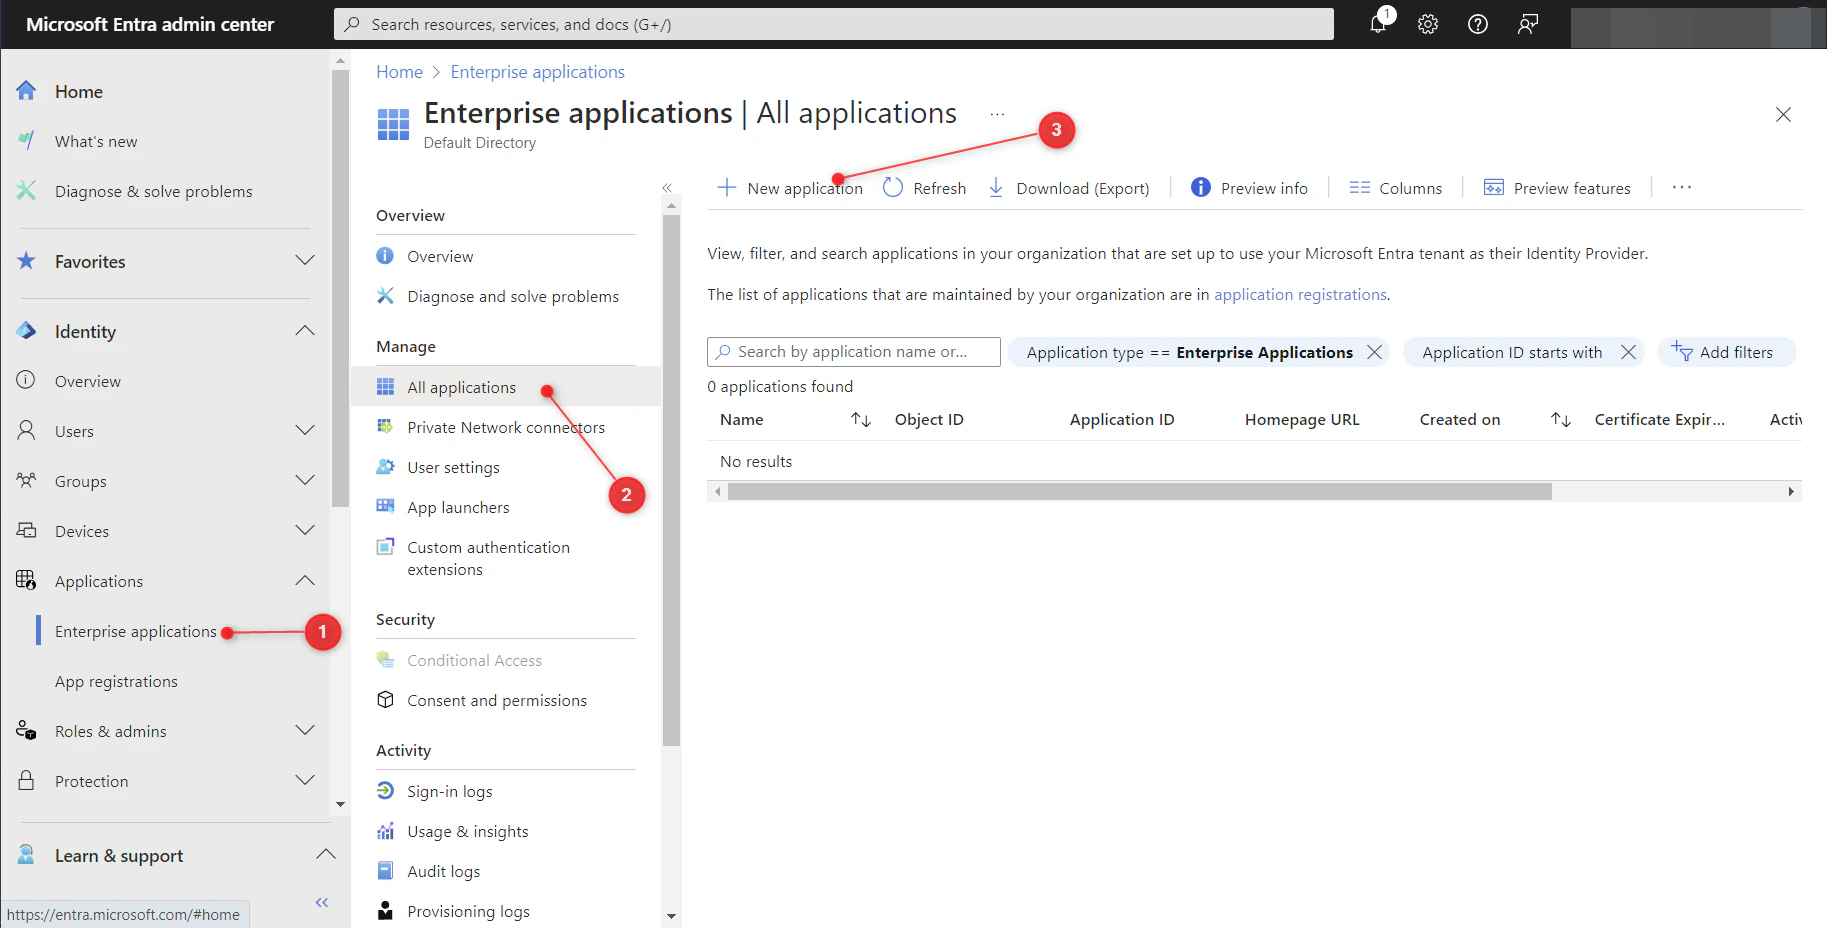
* 创建企业应用程序：

<img src="https://mintcdn.com/brightdata-ipv6-release/goTKF0pTvyg90BEz/images/general/authentication/entra-sso/entra_1.png?fit=max&auto=format&n=goTKF0pTvyg90BEz&q=85&s=ca3b60a73a69b42f8b2065a851bb5019" alt="" width="1827" height="928" data-path="images/general/authentication/entra-sso/entra_1.png" />

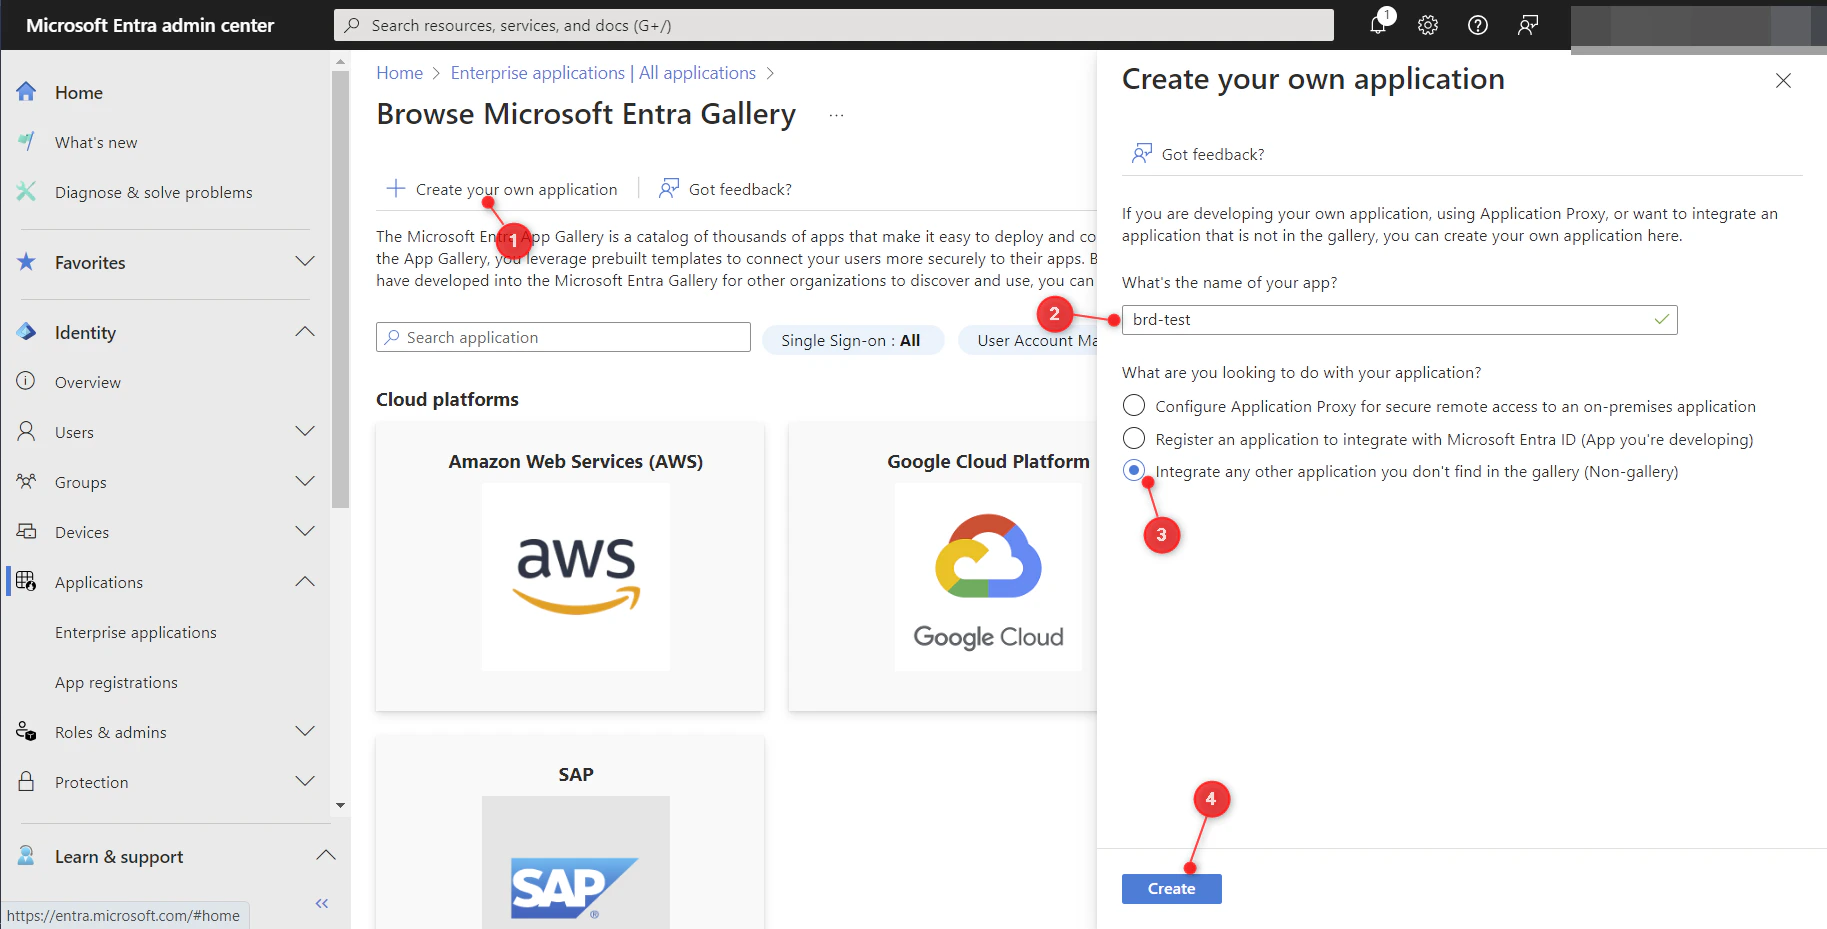
* 点击“创建自己的应用程序”
* 输入应用程序名称
* 选择“集成其他未在应用库中列出的应用程序（非库应用程序）”
* 点击“创建”

<img src="https://mintcdn.com/brightdata-ipv6-release/goTKF0pTvyg90BEz/images/general/authentication/entra-sso/entra_2.png?fit=max&auto=format&n=goTKF0pTvyg90BEz&q=85&s=6731d25124203b00e61557ad6b8ee5fe" alt="" width="1827" height="929" data-path="images/general/authentication/entra-sso/entra_2.png" />

## 设置 SSO

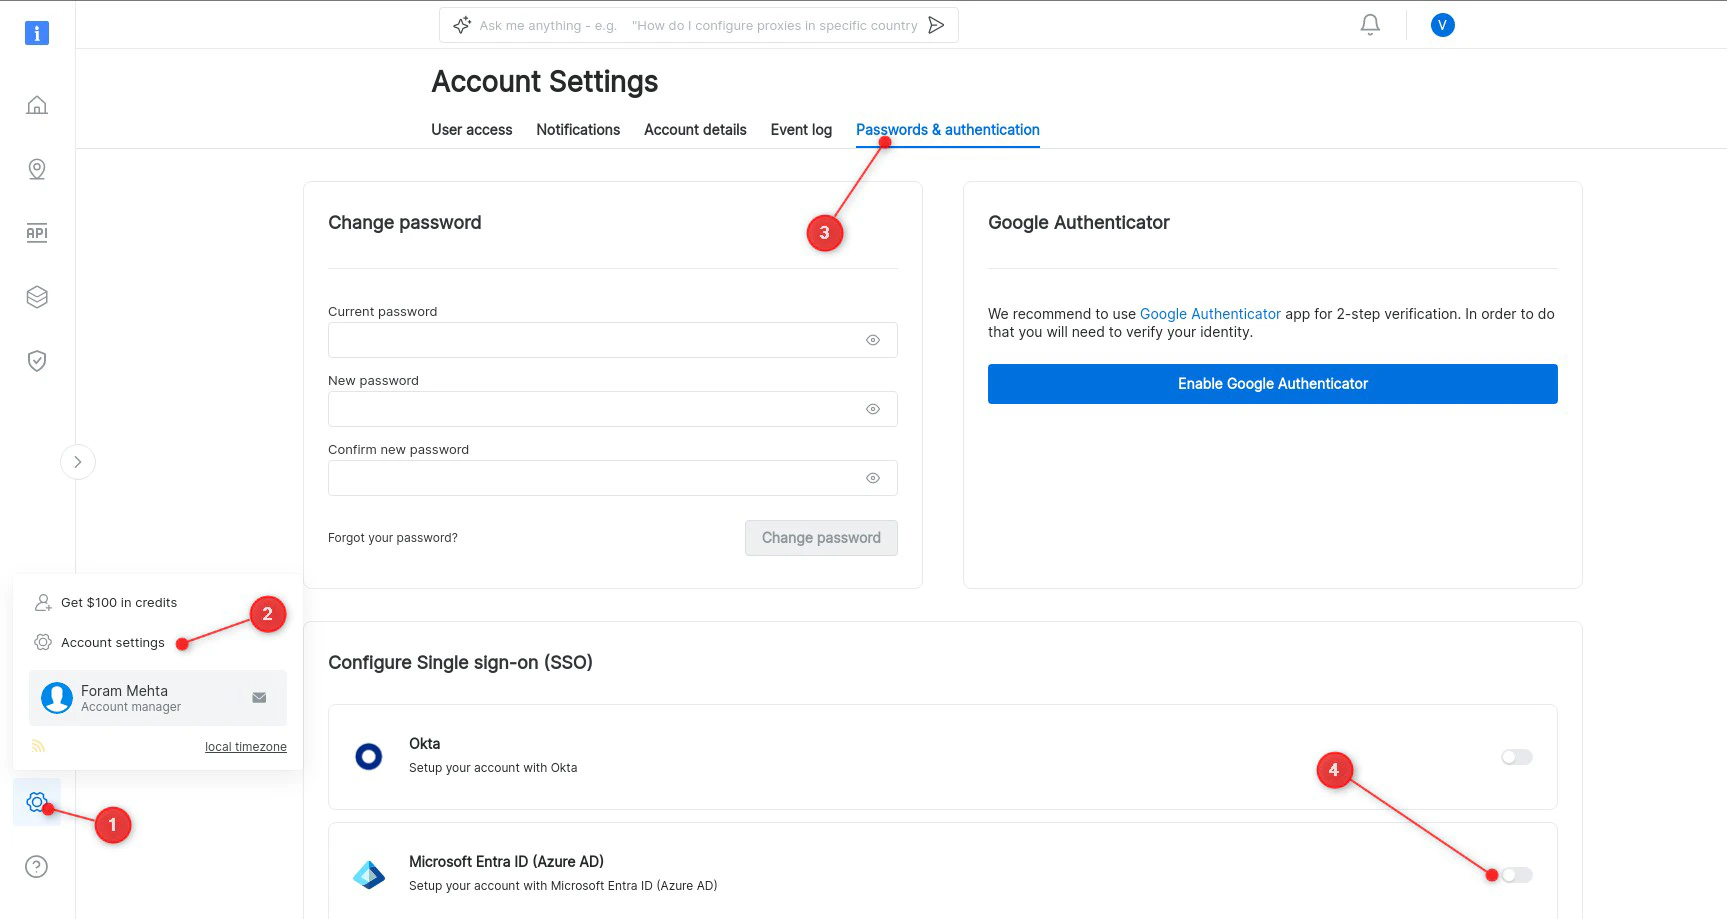
* 访问 [https://brightdata.com，并登录账户。](https://brightdata.com，并登录账户。)
* 在左侧菜单中选择“设置”->“账户设置”->“密码和身份验证”，并启用“Microsoft Entra ID (Azure AD) ”

<img src="https://mintcdn.com/brightdata-ipv6-release/goTKF0pTvyg90BEz/images/general/authentication/entra-sso/entra_3.png?fit=max&auto=format&n=goTKF0pTvyg90BEz&q=85&s=fc5236e286644807e32730723940ecfb" alt="" width="1727" height="919" data-path="images/general/authentication/entra-sso/entra_3.png" />

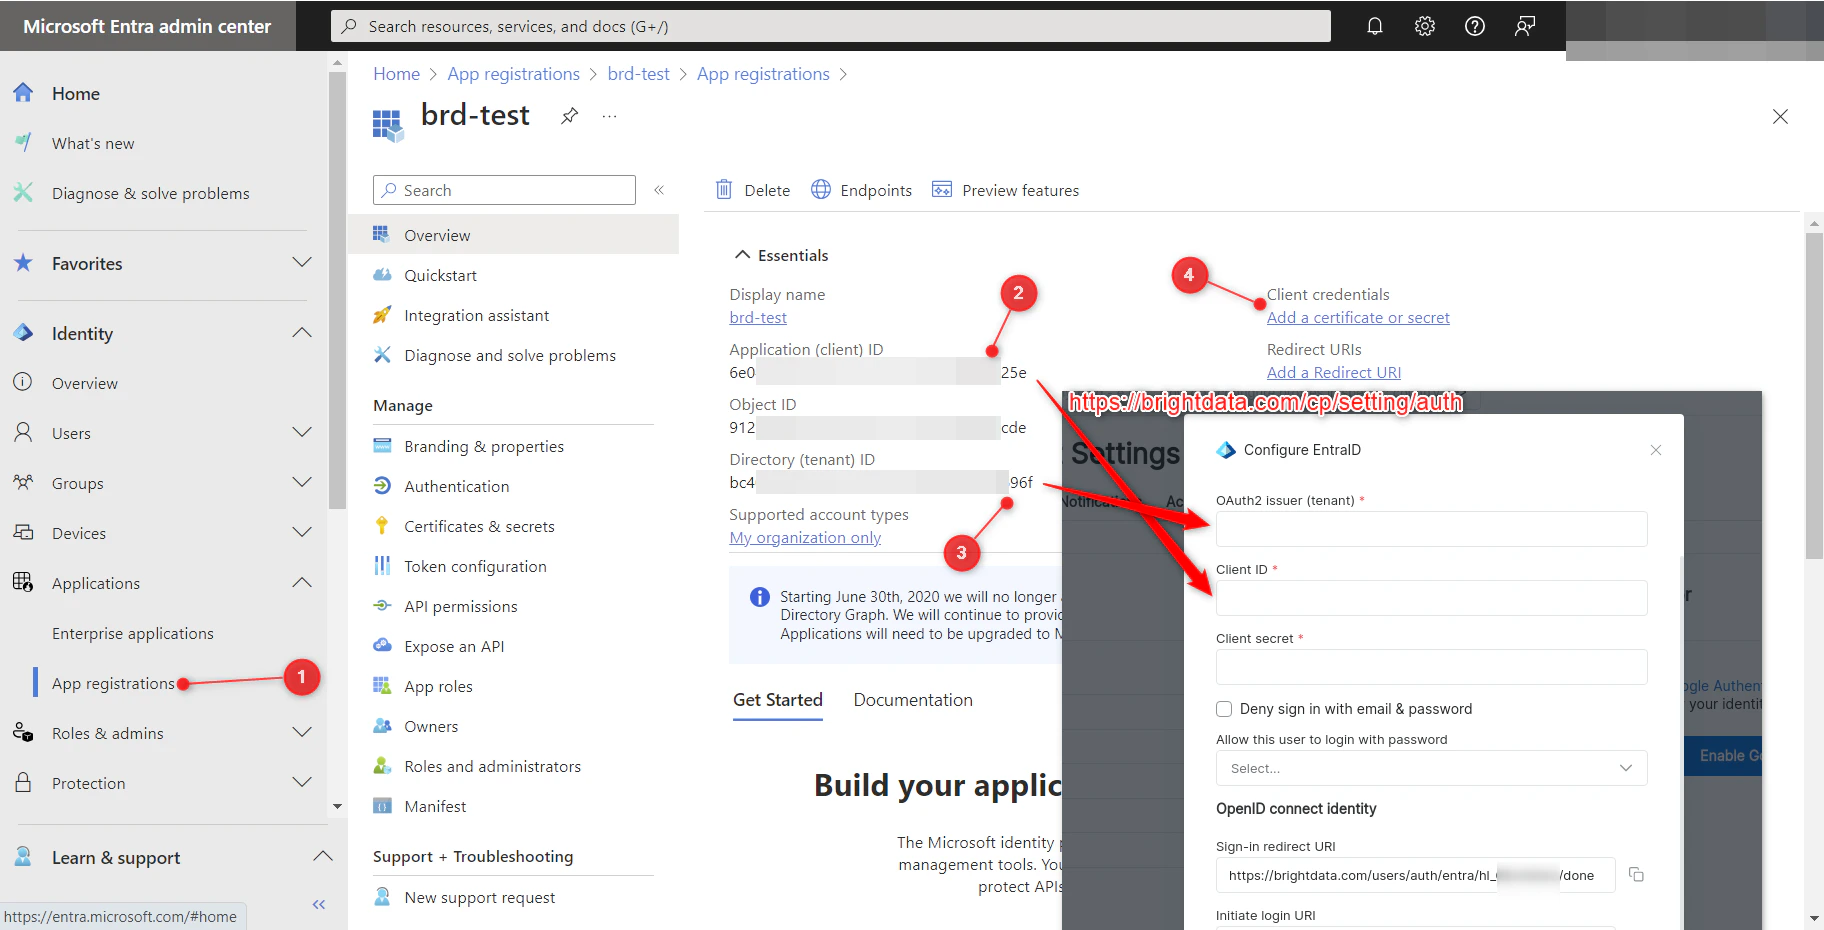
* 从“应用程序注册”视图中选择应用程序。
* 将“应用程序（客户端）ID”复制到“客户端 ID”
* 将“目录（租户）ID”复制到“OAuth2 颁发者（租户）”
* 转到“添加证书或密钥”

<img src="https://mintcdn.com/brightdata-ipv6-release/goTKF0pTvyg90BEz/images/general/authentication/entra-sso/entra_4.png?fit=max&auto=format&n=goTKF0pTvyg90BEz&q=85&s=0a8201b76564c9786d95d67645c1f07d" alt="" width="1824" height="930" data-path="images/general/authentication/entra-sso/entra_4.png" />

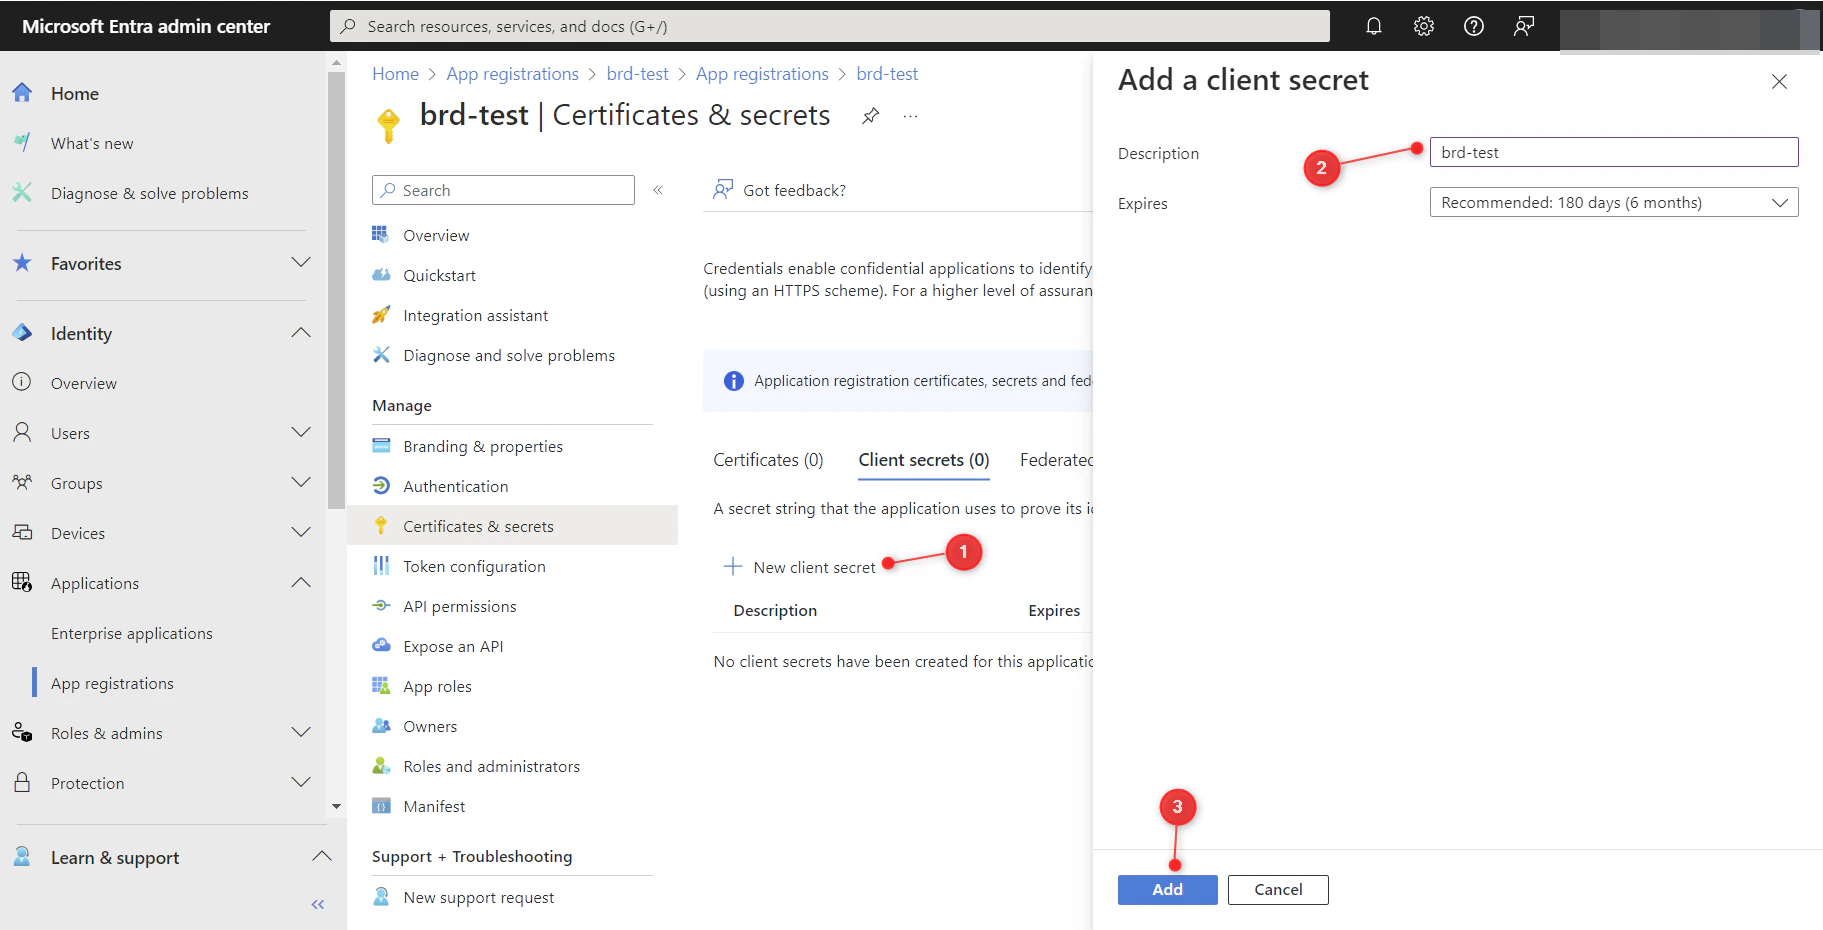
* 在密钥界面，点击“新建客户端密钥”
* 填写描述信息
* 点击“添加”

<img src="https://mintcdn.com/brightdata-ipv6-release/goTKF0pTvyg90BEz/images/general/authentication/entra-sso/entra_5.png?fit=max&auto=format&n=goTKF0pTvyg90BEz&q=85&s=9e2b42e80666ec69f52e5642f3ec342e" alt="" width="1823" height="930" data-path="images/general/authentication/entra-sso/entra_5.png" />

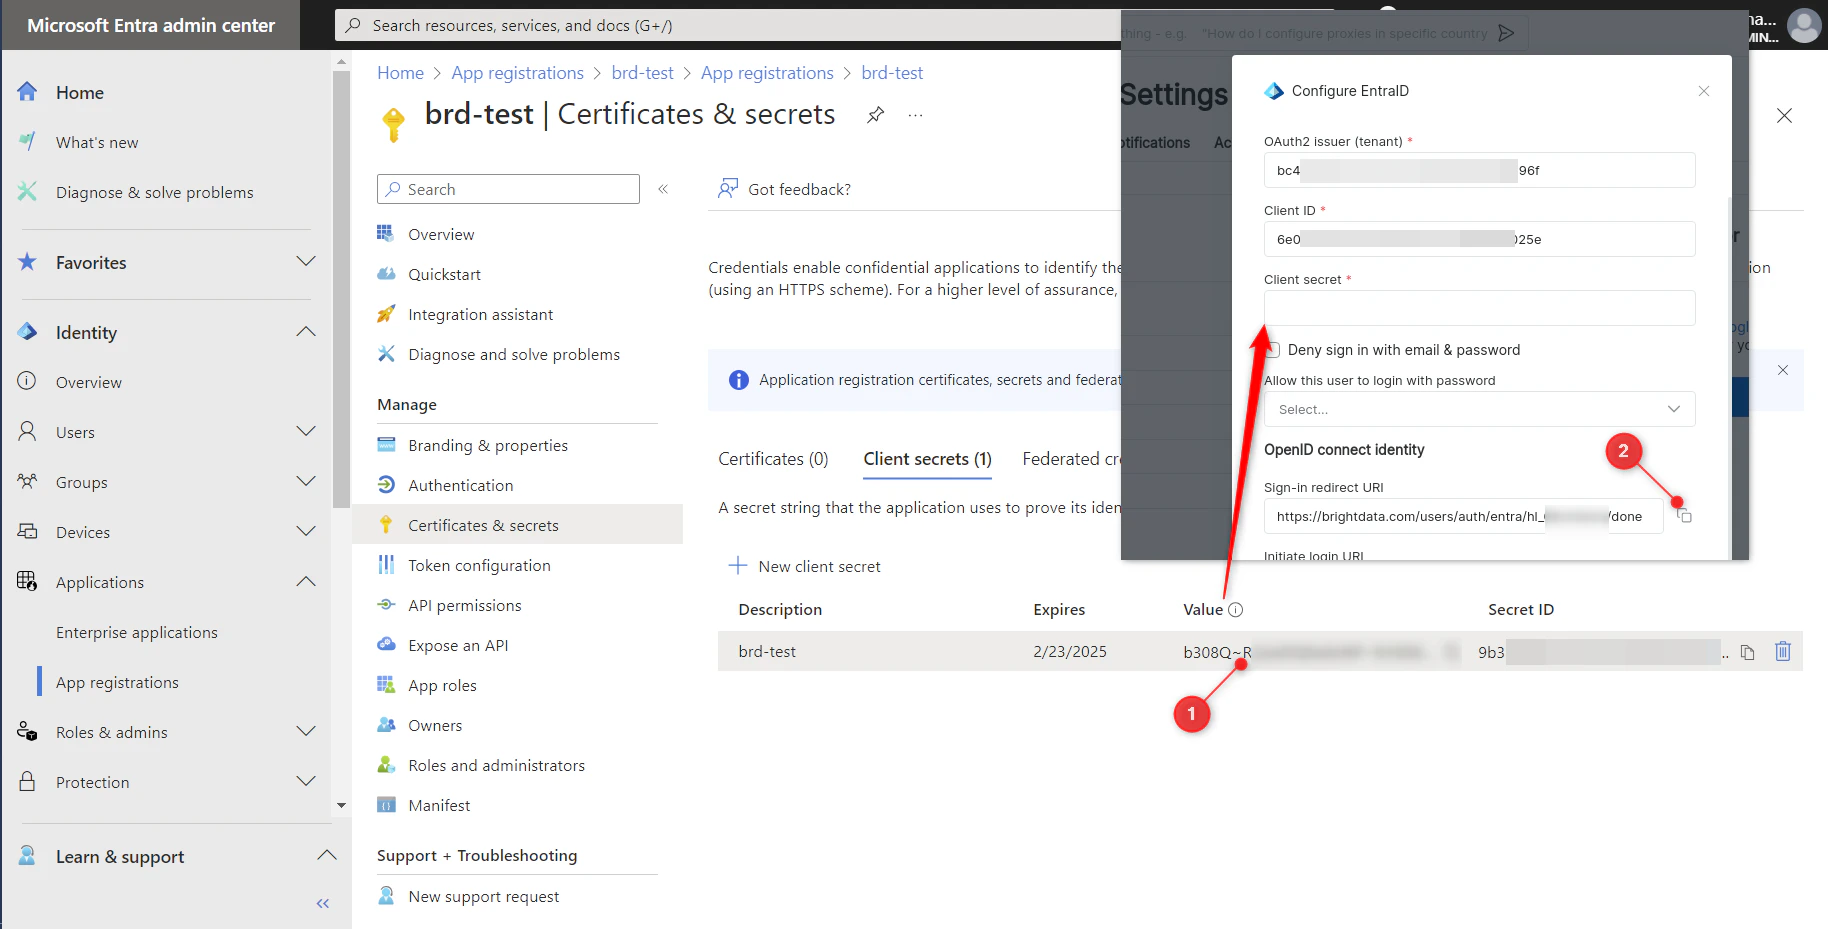
* 创建密钥后，将密钥值复制到“客户端密钥”。
* 复制“登录重定向 URI”，供后续步骤使用

<img src="https://mintcdn.com/brightdata-ipv6-release/goTKF0pTvyg90BEz/images/general/authentication/entra-sso/entra_6.png?fit=max&auto=format&n=goTKF0pTvyg90BEz&q=85&s=9107dc9e9d81c5ec1c3641f64390ce29" alt="" width="1828" height="929" data-path="images/general/authentication/entra-sso/entra_6.png" />

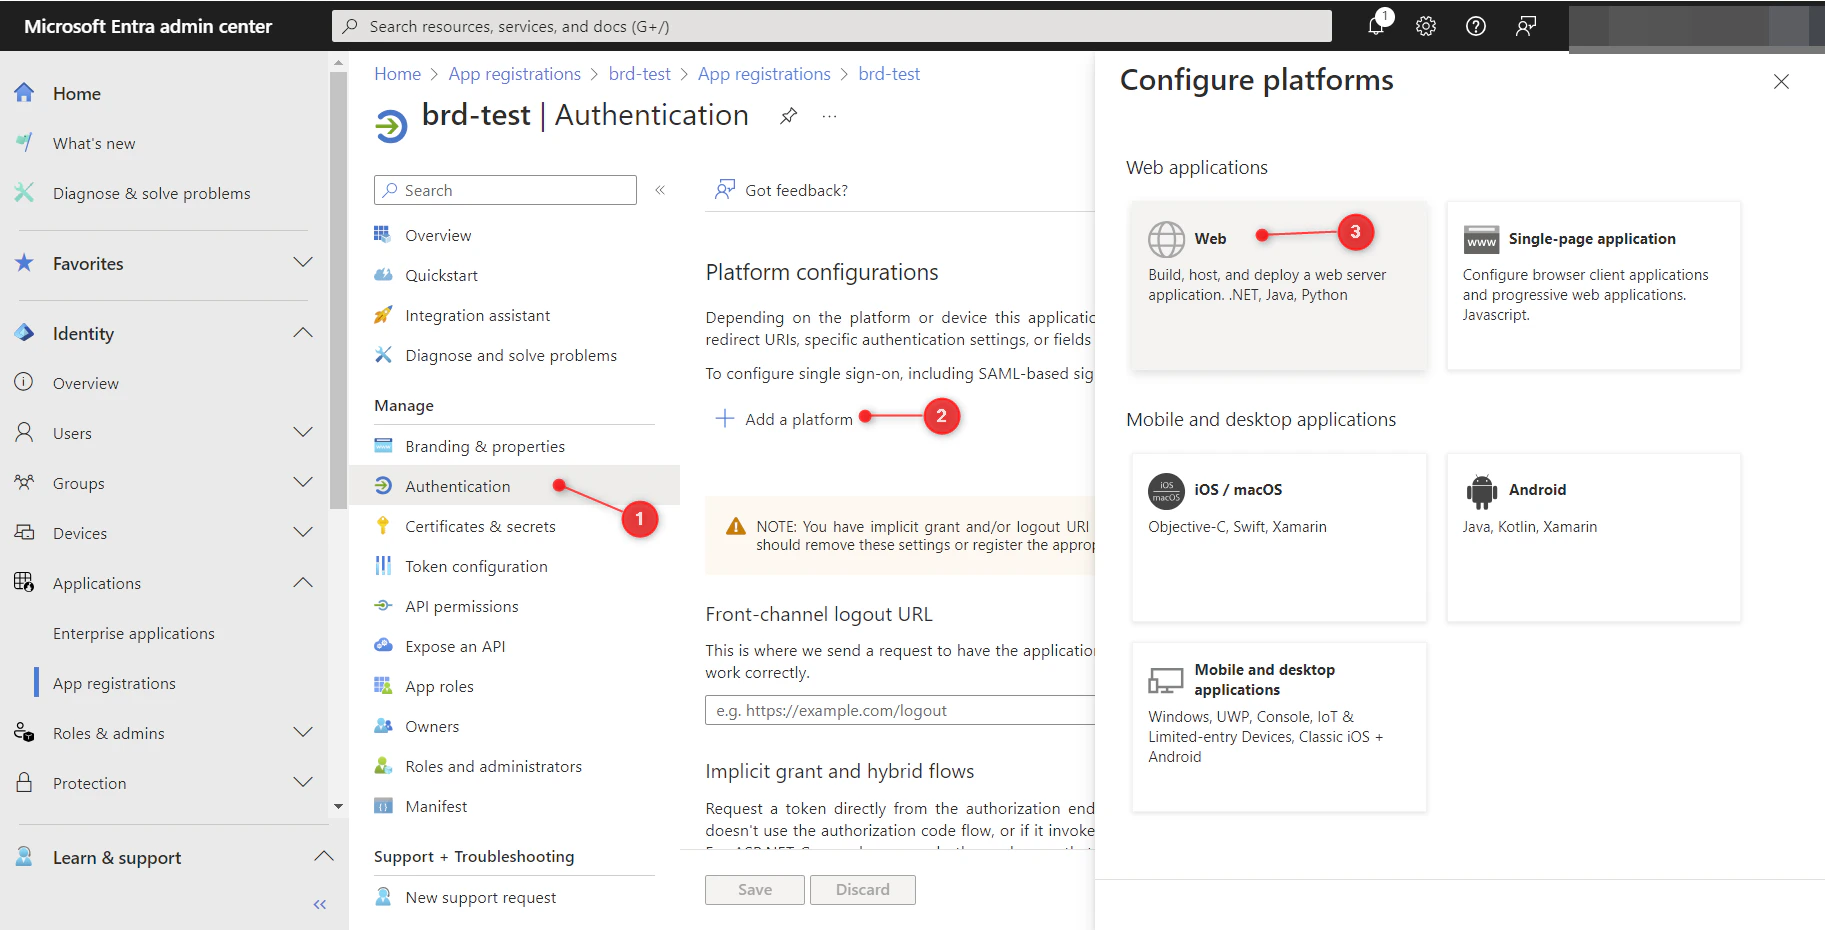
* 在“身份验证”界面，点击“添加平台”并选择“Web”

<img src="https://mintcdn.com/brightdata-ipv6-release/goTKF0pTvyg90BEz/images/general/authentication/entra-sso/entra_7.png?fit=max&auto=format&n=goTKF0pTvyg90BEz&q=85&s=eed40d15b4dd097277364a0c6c5e89a7" alt="" width="1825" height="930" data-path="images/general/authentication/entra-sso/entra_7.png" />

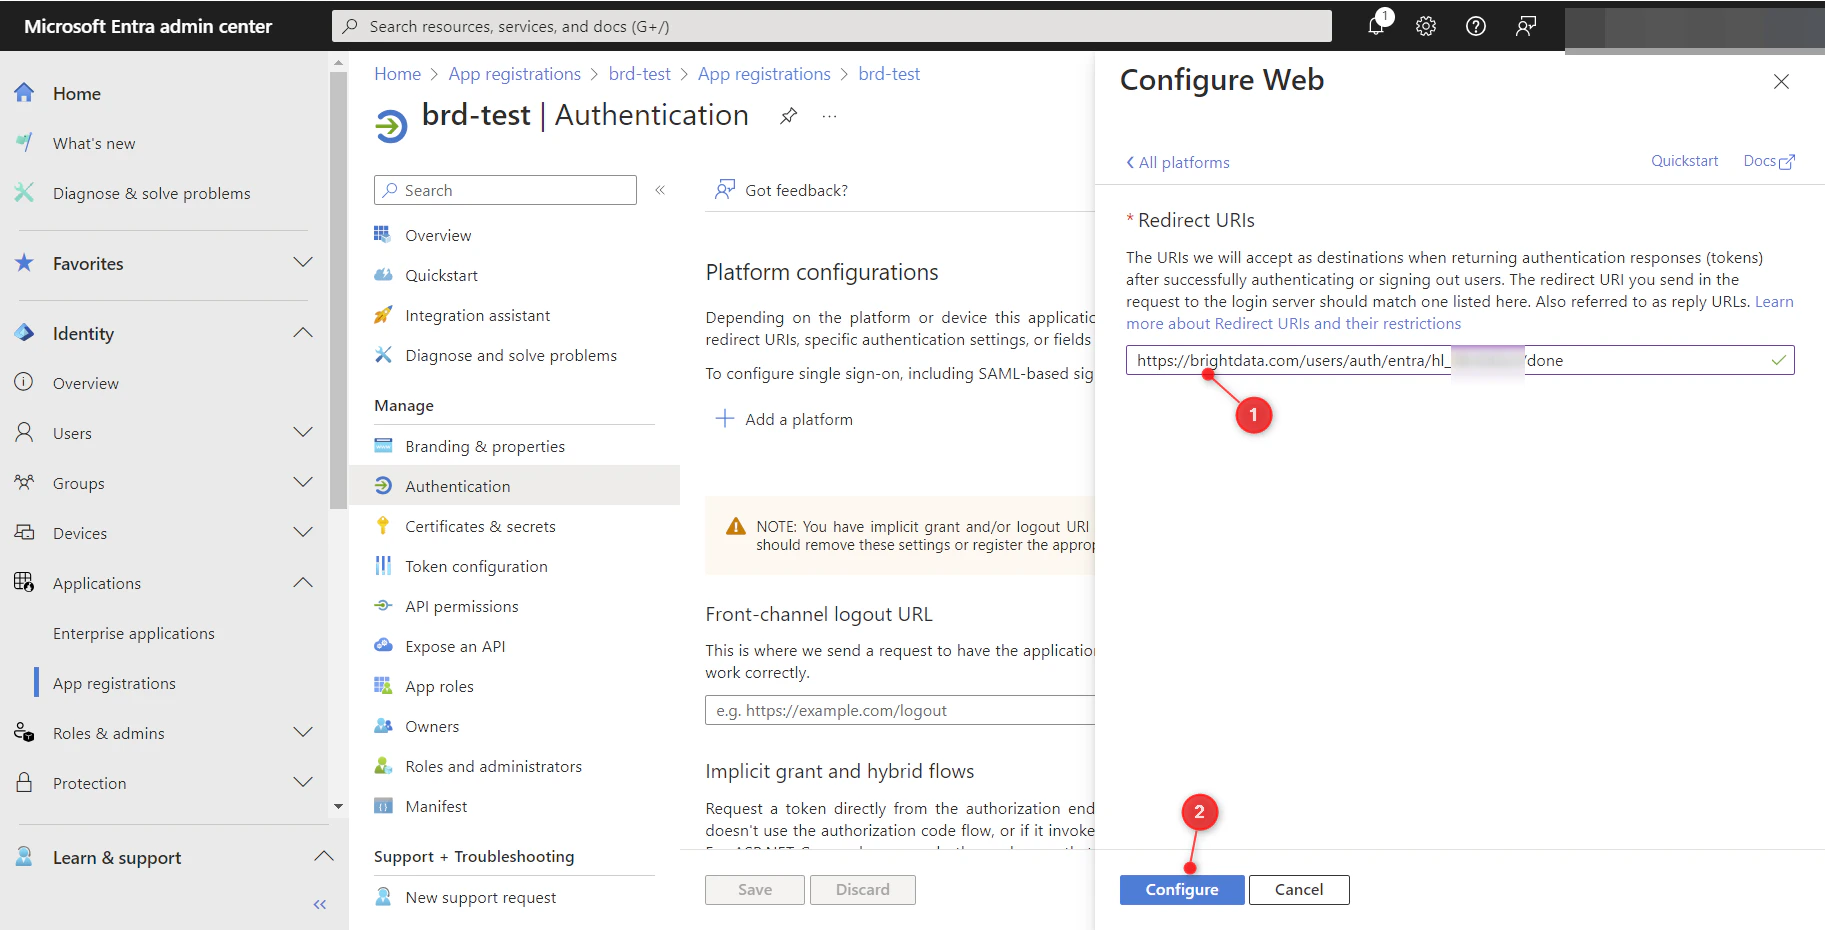
* 将之前复制的“登录重定向 URI”粘贴到“重定向 URI”中，然后点击“配置”以保存设置：

<img src="https://mintcdn.com/brightdata-ipv6-release/goTKF0pTvyg90BEz/images/general/authentication/entra-sso/entra_8.png?fit=max&auto=format&n=goTKF0pTvyg90BEz&q=85&s=54d6e38e6b4fe65714b7da35a23691e7" alt="" width="1825" height="930" data-path="images/general/authentication/entra-sso/entra_8.png" />

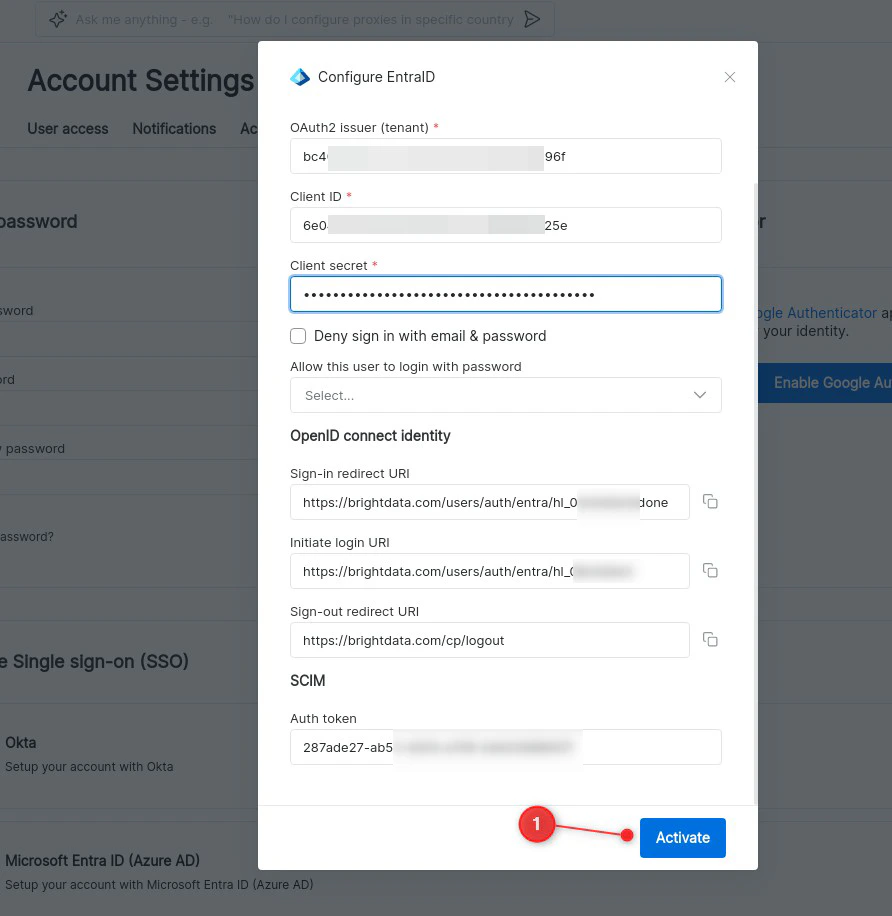
* 在 BrighData 控制面板中激活 EntraID 集成并测试登录情况：

<img src="https://mintcdn.com/brightdata-ipv6-release/goTKF0pTvyg90BEz/images/general/authentication/entra-sso/entra_9.png?fit=max&auto=format&n=goTKF0pTvyg90BEz&q=85&s=a14f5695b36ec664cb0b90410e372ca9" alt="" width="892" height="916" data-path="images/general/authentication/entra-sso/entra_9.png" />

## 设置 SCIM 配置

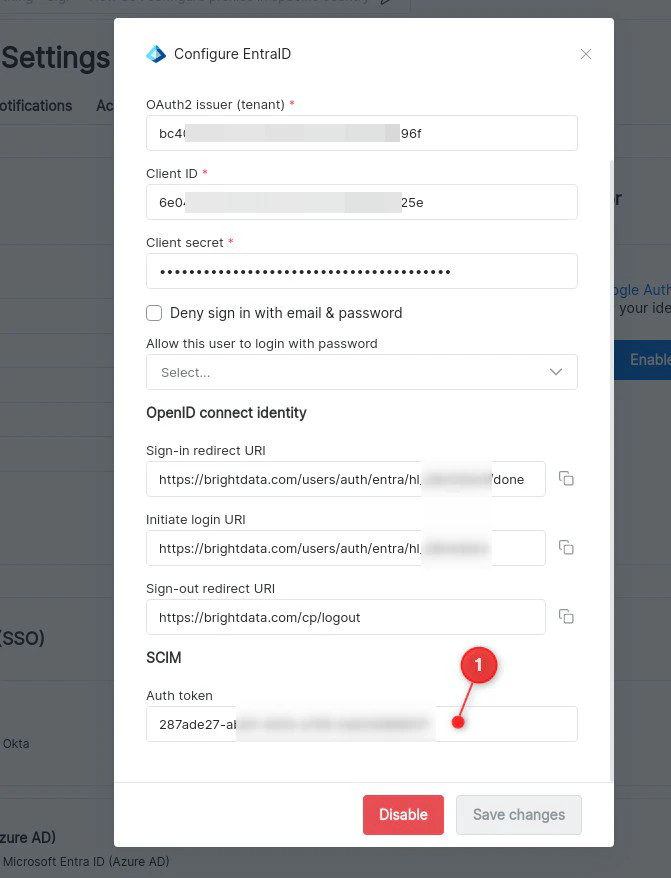
* 从 BrightData EntraID 设置的 SCIM 部分复制“身份验证令牌”：

<img src="https://mintcdn.com/brightdata-ipv6-release/goTKF0pTvyg90BEz/images/general/authentication/entra-sso/entra_10.png?fit=max&auto=format&n=goTKF0pTvyg90BEz&q=85&s=13b956a6186b1f65e89b22c4277bce71" alt="" width="671" height="878" data-path="images/general/authentication/entra-sso/entra_10.png" />

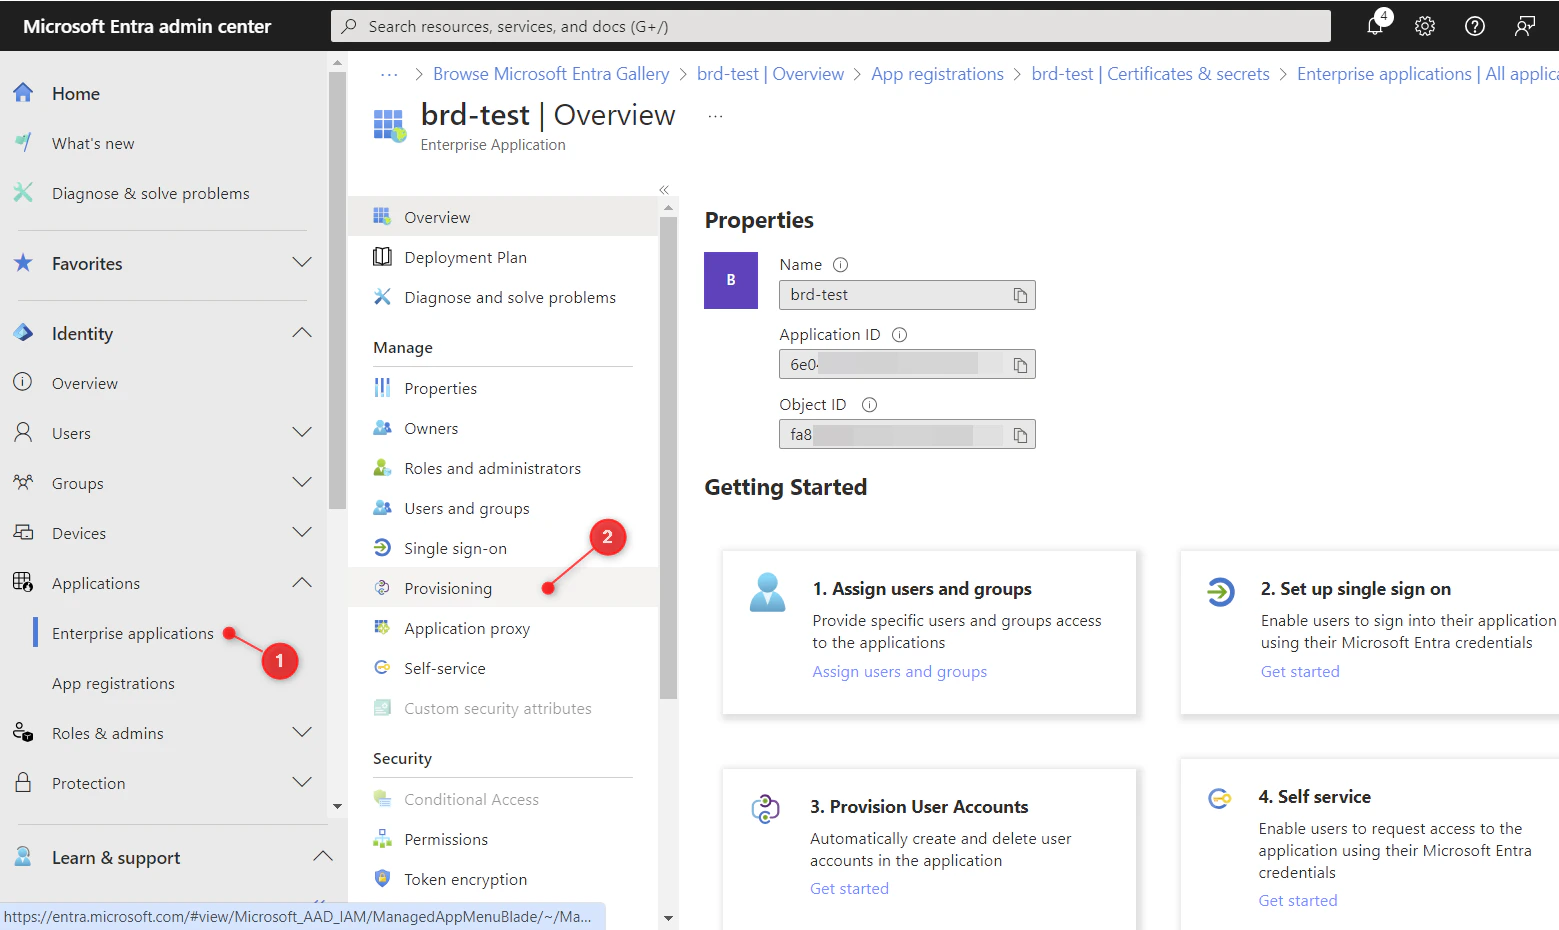
* 从“企业应用程序”视图中选择应用程序并转到“配置”设置：

<img src="https://mintcdn.com/brightdata-ipv6-release/goTKF0pTvyg90BEz/images/general/authentication/entra-sso/entra_11.png?fit=max&auto=format&n=goTKF0pTvyg90BEz&q=85&s=3ed70a4e780a6ec314961327d717f99f" alt="" width="1559" height="930" data-path="images/general/authentication/entra-sso/entra_11.png" />

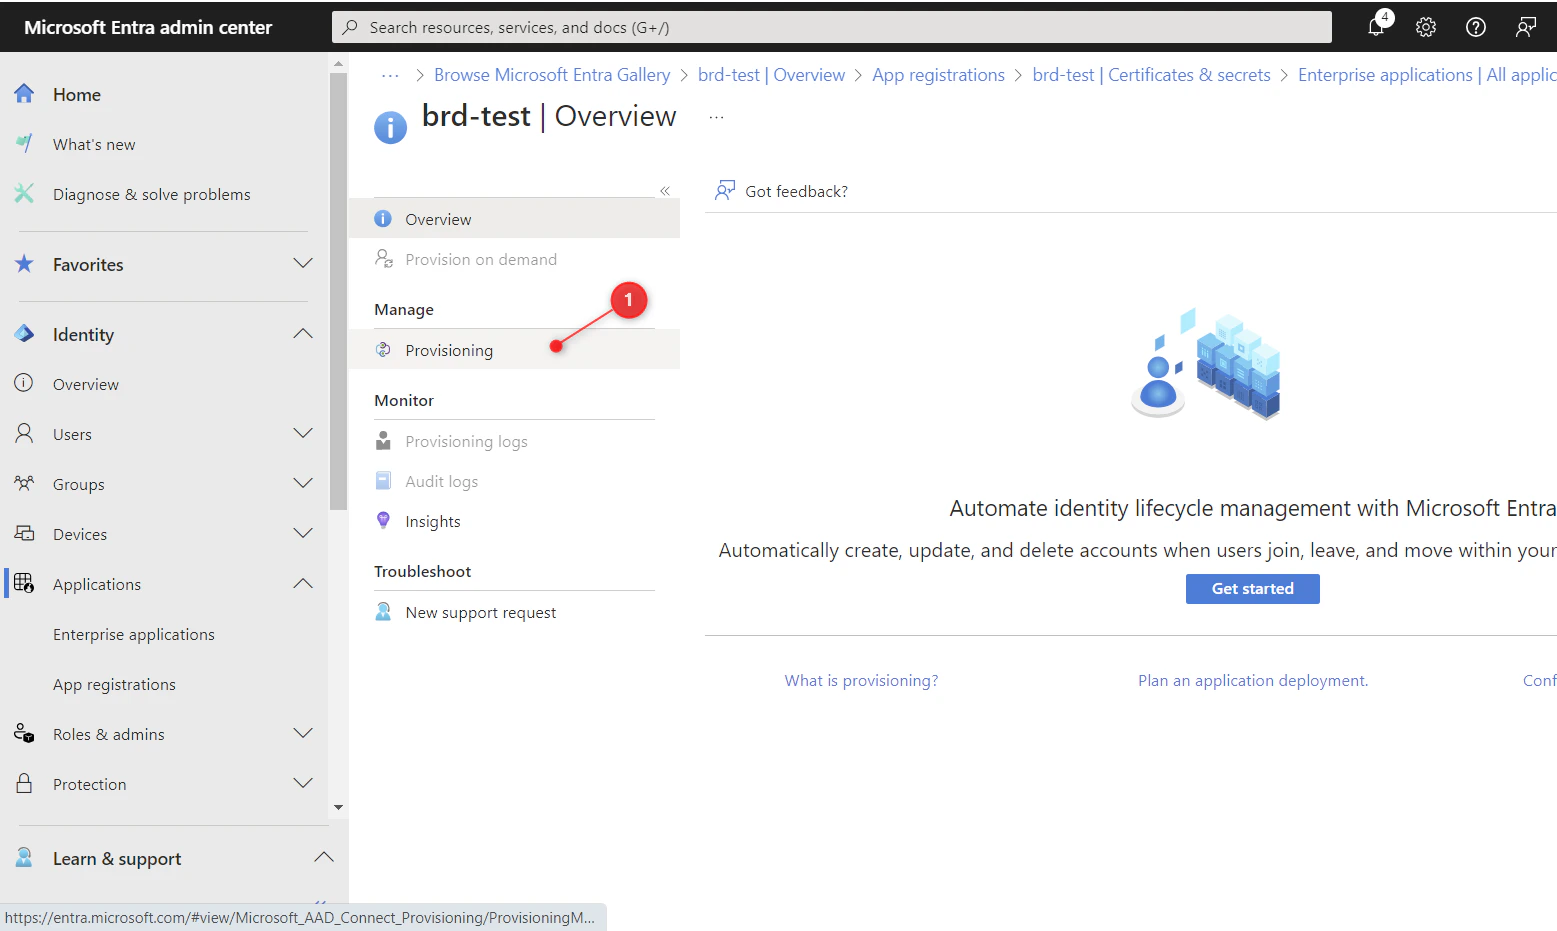
* 在“管理”菜单下选择“配置”：

<img src="https://mintcdn.com/brightdata-ipv6-release/goTKF0pTvyg90BEz/images/general/authentication/entra-sso/entra_12.png?fit=max&auto=format&n=goTKF0pTvyg90BEz&q=85&s=ae2e791739d40acff4ca6215dc9039f3" alt="" width="1557" height="931" data-path="images/general/authentication/entra-sso/entra_12.png" />

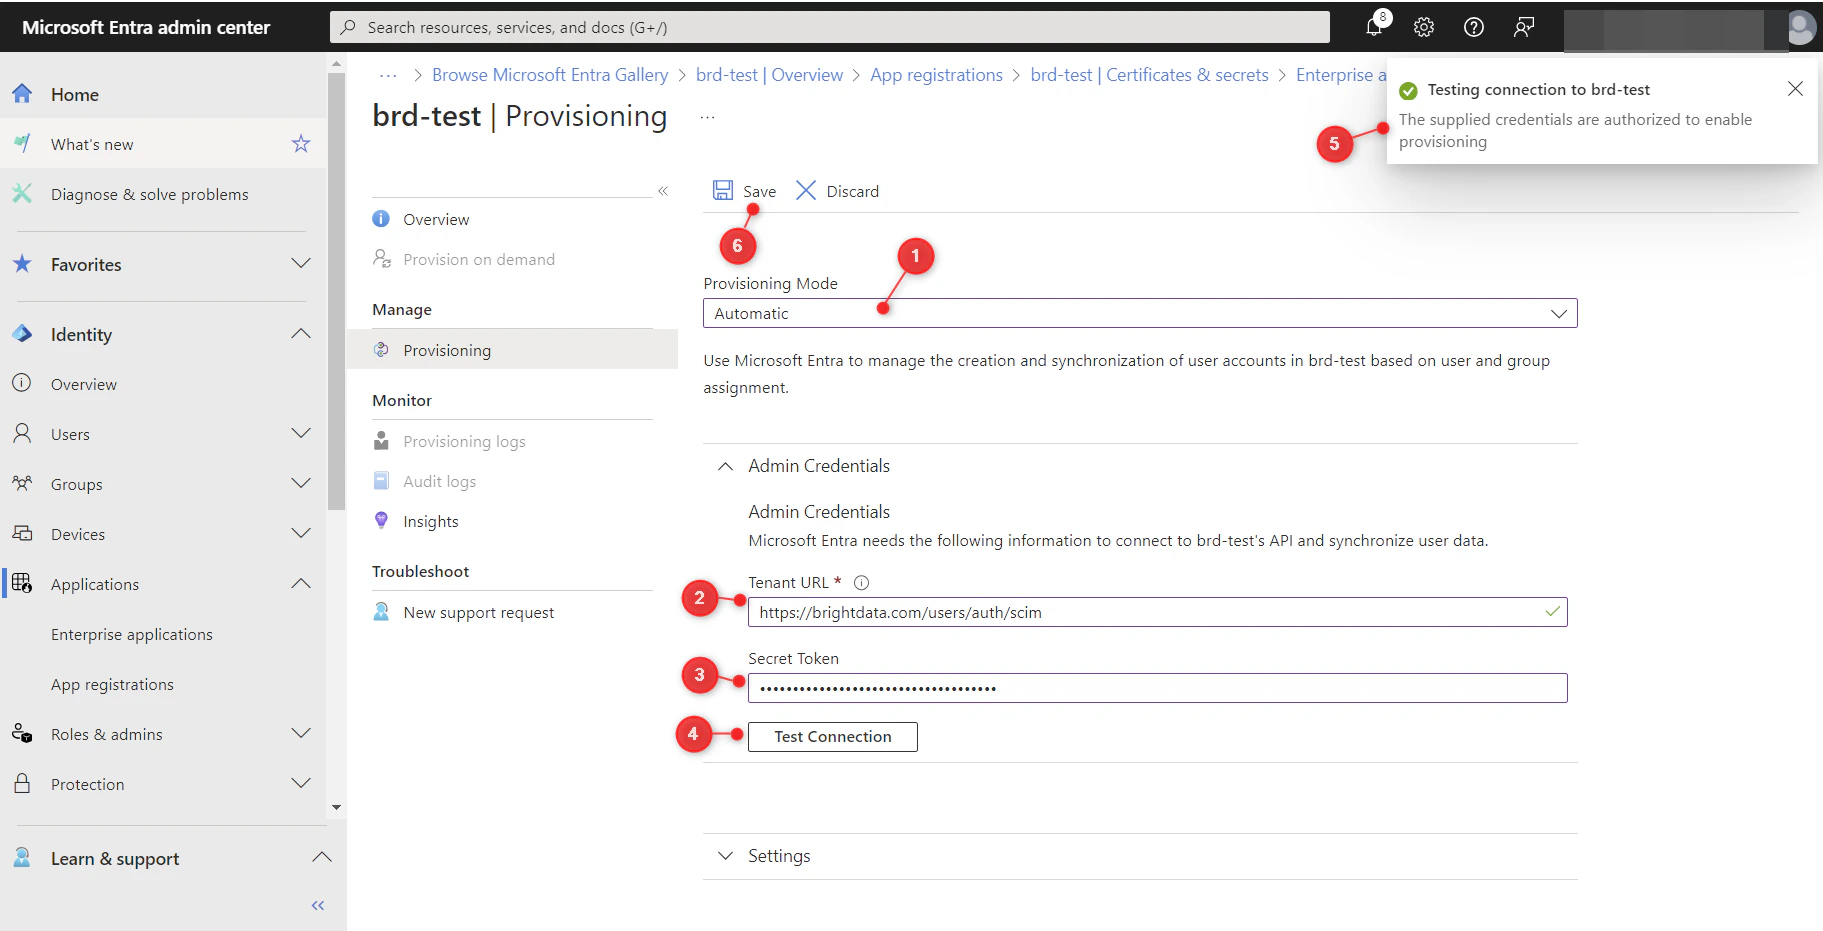
* 选择“自动”配置模式
* 在“租户 URL”中填入“[https://brightdata.com/users/auth/scim”](https://brightdata.com/users/auth/scim”)
* 在“密钥令牌”中填入之前从 BrightData 控制面板设置中复制的值
* 测试连接状态。 右上角应会显示成功提示
  保存设置
<img src="https://mintcdn.com/brightdata-ipv6-release/goTKF0pTvyg90BEz/images/general/authentication/entra-sso/entra_13.png?fit=max&auto=format&n=goTKF0pTvyg90BEz&q=85&s=a1206c60512dcb7d0a1f9e5215f15bd6" alt="" width="1823" height="931" data-path="images/general/authentication/entra-sso/entra_13.png" />

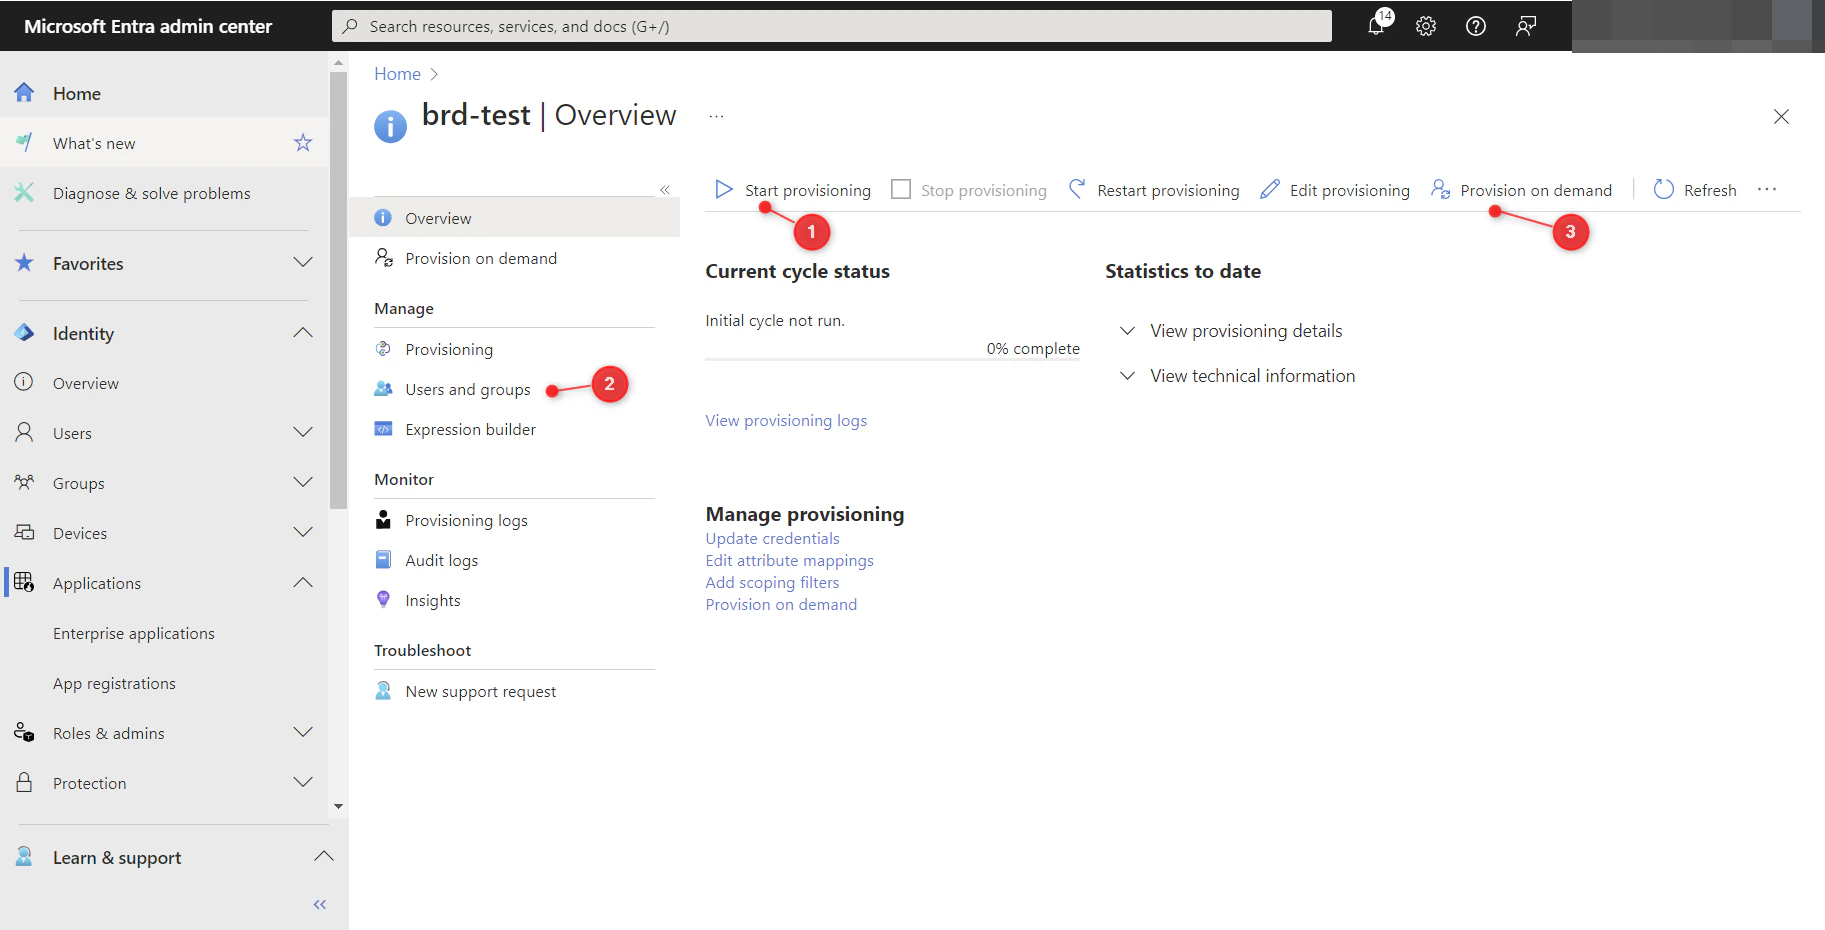
* 返回“概述”选项卡，点击“开始配置”。
* 您可以在“按需配置”页面测试配置，但需要先在“用户和群组”页面为 BrightData 应用程序分配用户：

<img src="https://mintcdn.com/brightdata-ipv6-release/goTKF0pTvyg90BEz/images/general/authentication/entra-sso/entra_14.png?fit=max&auto=format&n=goTKF0pTvyg90BEz&q=85&s=7287e634944ad70a168e7e2c8217043b" alt="" width="1825" height="930" data-path="images/general/authentication/entra-sso/entra_14.png" />